Quilting can feel like magic when a flat top turns rich and textured. The right stitch pattern can make that change feel bold, soft, or delightfully playful.
1. Echo Stitching
Top Echo Stitching Craft Tutorials
- 💅 Echo quilting with a walking foot adds visual appeal from quiltsocial.com.
- 🖼️ How to Create Echo Stitching – Threads Magazine from threadsmagazine.com.
- 🗺️ Echo Ditching Tutorial for Leaf Peepers from leahday.com.
- 🍁 Extra Practice Quilting Echo Shell from freemotionproject.com.
- 🍂 Echo stitching on quilting designs from facebook.com.
Echo stitching frames a shape with neat lines that follow its outline like ripples on water. It gives a quilt a calm, polished look that feels both modern and classic.
This style works well on flowers, stars, and simple blocks because it helps the design stand out. It can be done with a basic machine setup, so the cost stays friendly for many makers. Try wide spacing for a soft look or tight spacing for a more dramatic finish.
2. Organic Meander

Top Organic Meander Craft Tutorials
- 🍁 What is the second block of leaves in the pattern? from facebook.com.
- 🧑🌾 Meander Greek Key 2IN from fringemarket.com.
- 🎄 Meander from badsheepyarn.com.
- 🍅 MEANDER from borrowedearthobjects.com.
- 💅 Organic Choreography: An Interview with Jane Alison … from kenyonreview.org.
Organic meander adds loose, curvy lines that move across the quilt in a relaxed way. Before stitching, the quilt may look flat, but after quilting it feels lively and full of motion.
It is a great choice for beginners because the path does not need to be perfect. This style hides small mistakes well, which makes it useful for everyday quilts and charity projects. Many quilters like it because it uses little thread and works with low-cost supplies.
For a personal touch, vary the loop size or add tiny pauses near special fabric prints. It is also a smart trend for modern quilts that want an easy, hand-drawn feel.
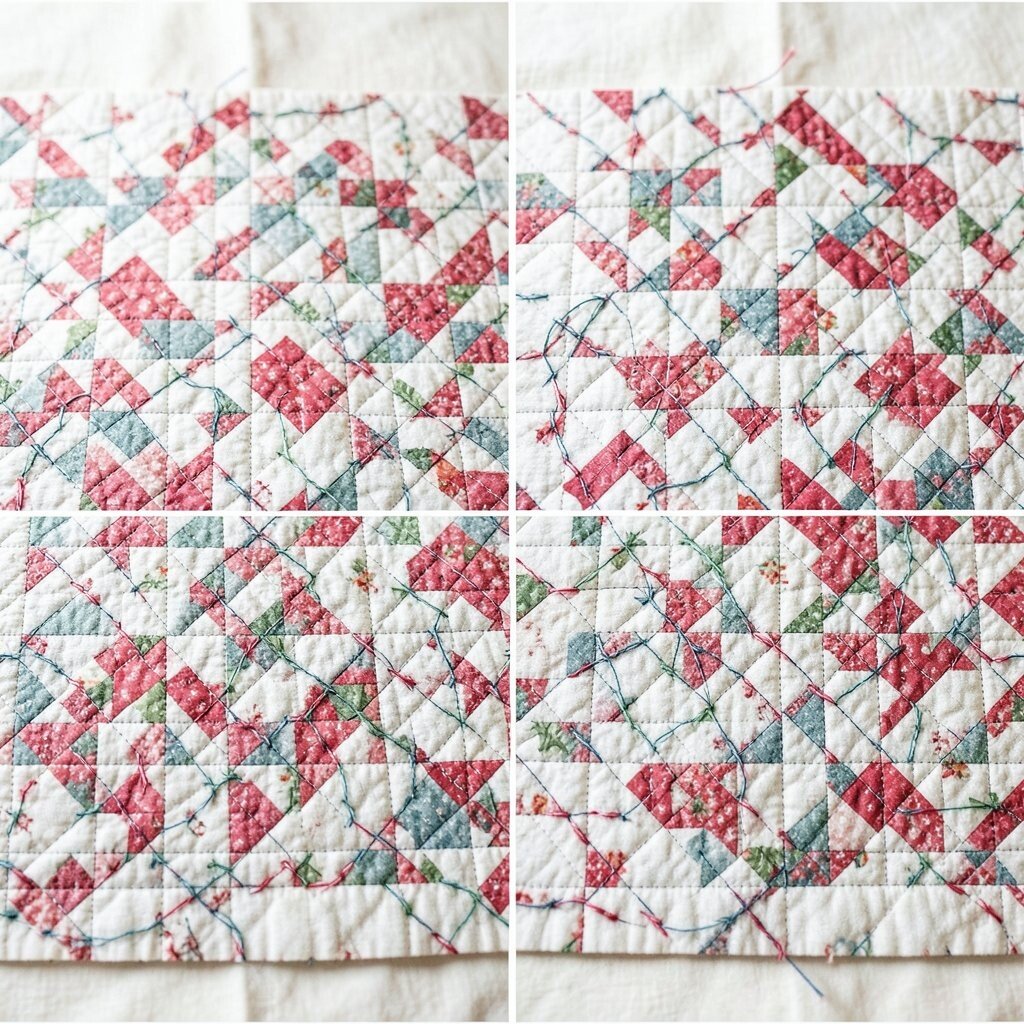
3. Crosshatch Lines
Top Crosshatch Lines Craft Tutorials
- 🗺️ 6 Basic Forms of Hatching and Cross Hatching from craftsy.com.
- 🍁 The Beginner's Guide to Crosshatching from thepostmansknock.com.
- 🎨 Beginner-friendly colouring techniques to try: Hatching and … from selfieclothing.co.uk.
- 🎨 Here are some tips on cross-hatching; I hope you find … from facebook.com.
- 🖼️ Hatching and Cross Hatching Lines from teacherspayteachers.com.
Crosshatch stitching creates a grid of straight lines that can look crisp and tidy. Before quilting, a plain patchwork top may seem simple, but after quilting it gains structure and charm.
This pattern is great for showing off geometric fabric and sharp block shapes. It also helps keep batting in place, which adds strength for daily use. A walking foot makes the job easier, and that tool is often an affordable add-on for home machines.
You can make the grid wide for a soft farmhouse style or tight for a bold, tailored look. Many makers like to tilt the lines on purpose, which gives the quilt a fresh, current feel.
4. Pebble Fill
Top Pebble Fill Craft Tutorials
- 🍁 It only takes a few pebbles, a bowl, and glue to create this … from facebook.com.
- 👓 Create a Pebble Mosaic from finegardening.com.
- 🍅 DIY Pebble Art Tutorial from howweelearn.com.
- 🖼️ Easy Pebble Art Family Portrait from itsalwaysautumn.com.
- 👓 15 Pebble Craft Ideas That Turn Simple Stones Into … from diys.com.
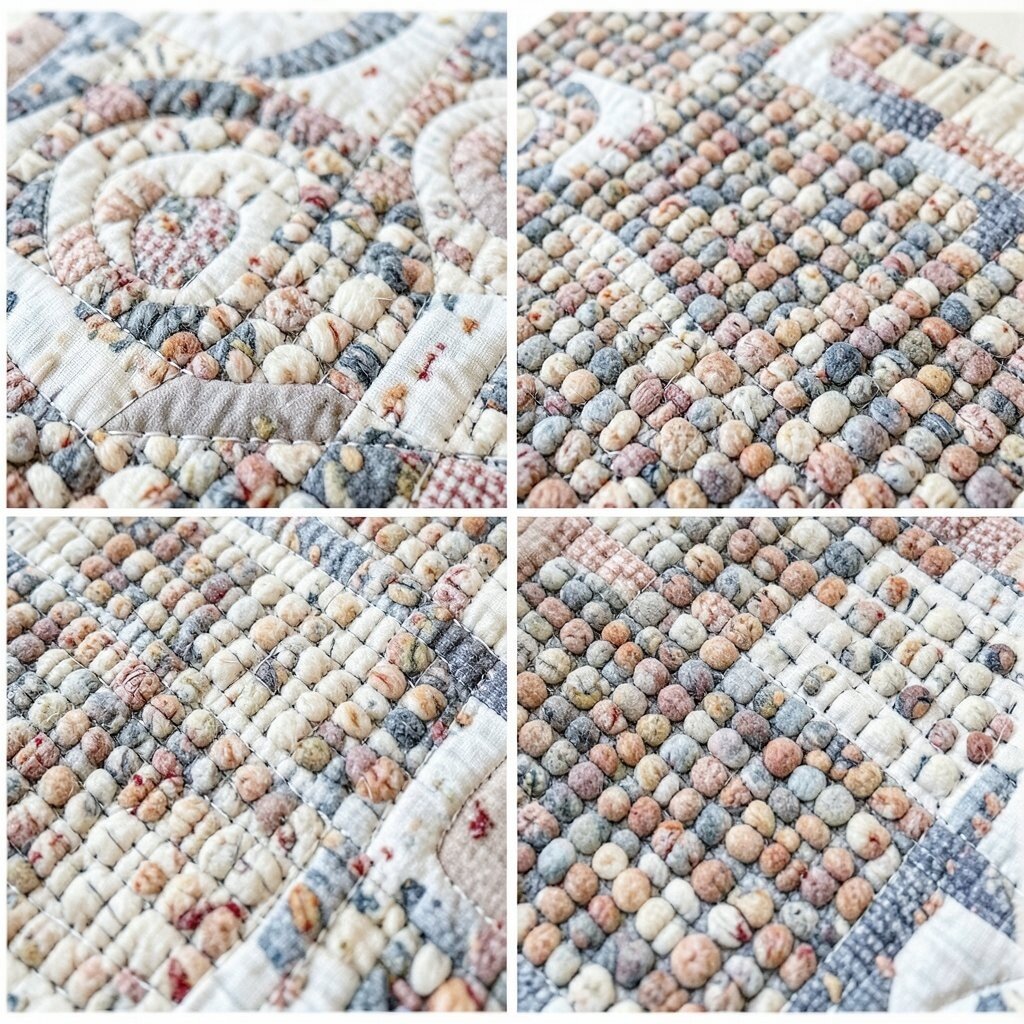
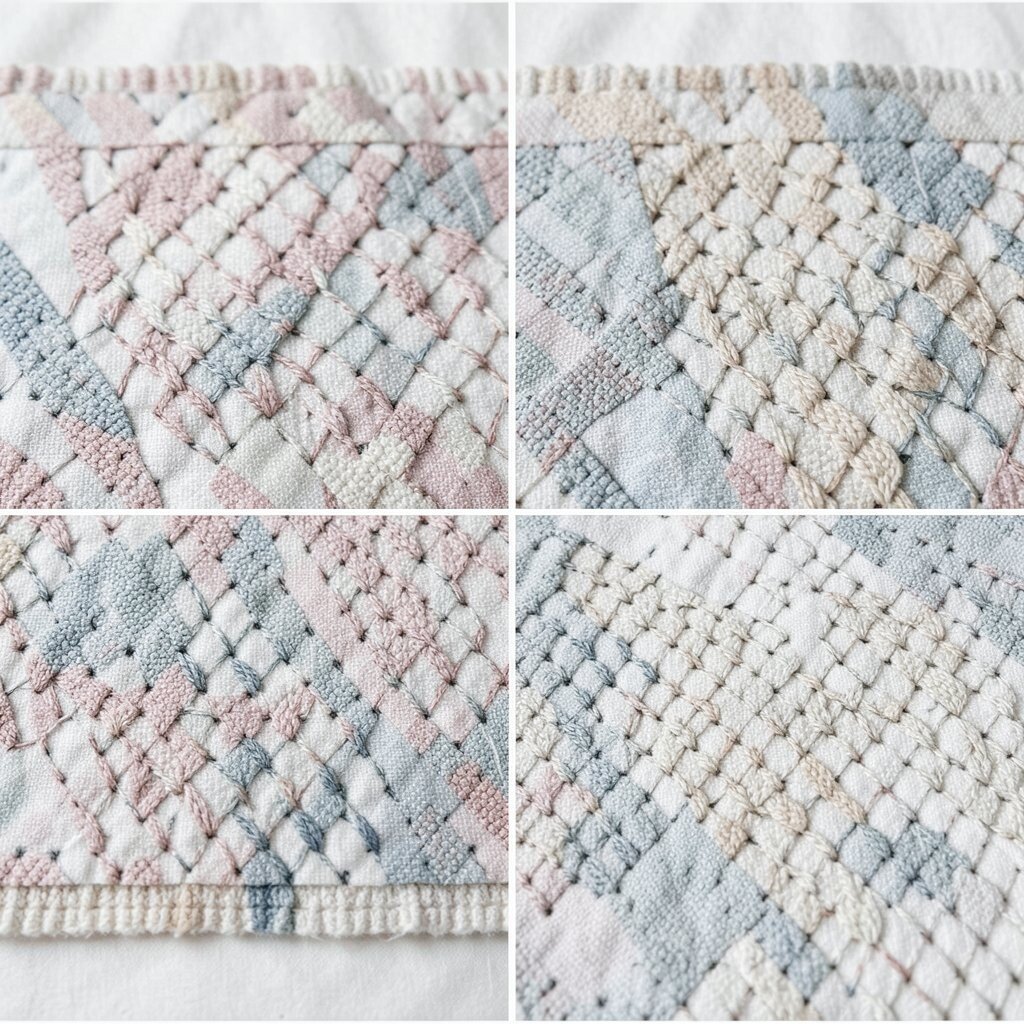
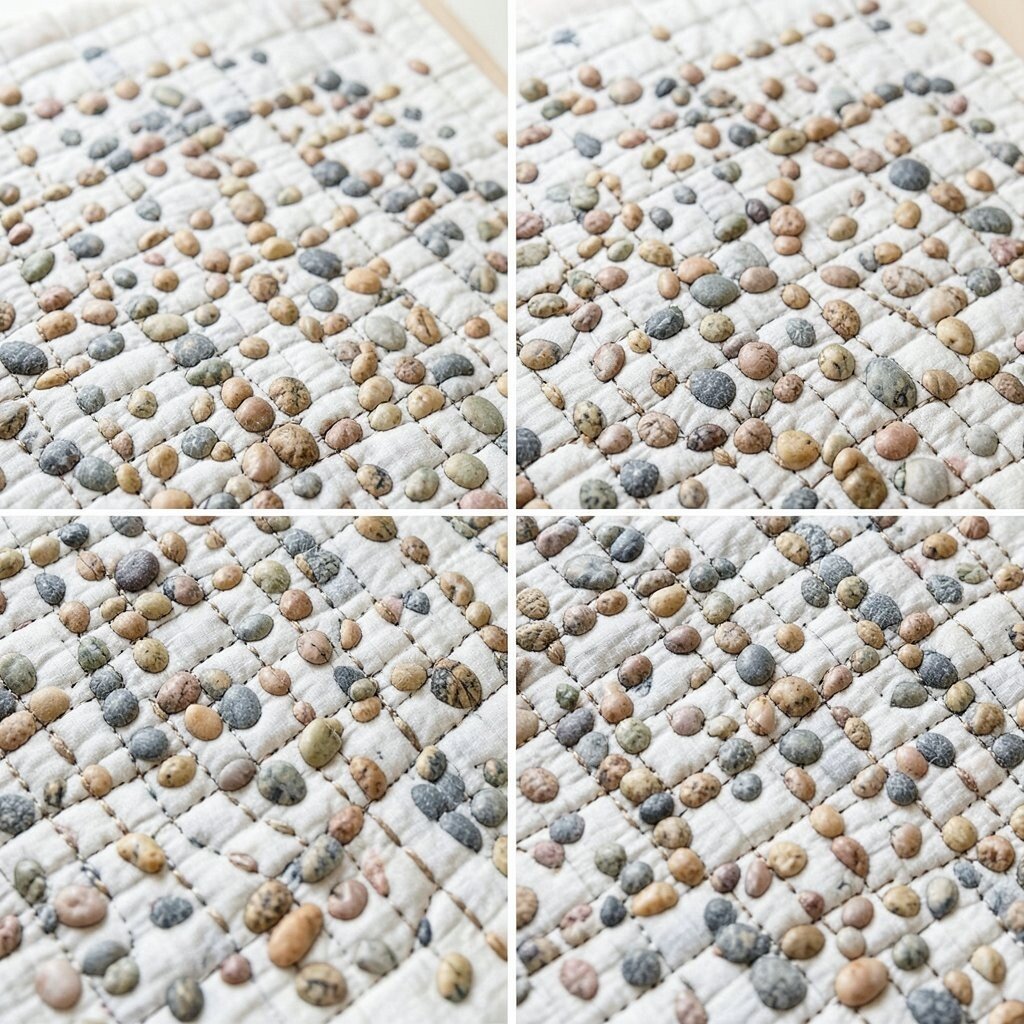
Pebble fill uses tiny round stitches packed close together like a basket of smooth stones. Before quilting, open spaces can look empty, but after quilting they feel rich and full.
This design adds a lot of texture and makes a quilt feel cozy in the hand. It is useful around borders, medallions, and background areas where the main blocks need to shine. Thread use can be higher than with simple lines, so planning your budget matters if the quilt is large.
Try pebbling around a name panel or special motif to make it feel more personal. The look is very popular in art quilting because it adds depth without needing bright colors.
5. Stitch-in-the-Ditch
Top Stitch-in-the-Ditch Craft Tutorials
- 🎄 Stitch in the Ditch Beginner Quilting Tutorial from sewnikki.com.
- 🍁 Sewing the BEST Stitch in the Ditch Tutorial from wonderfil.ca.
- 🎨 How to Stitch in the Ditch from kimberbell.com.
- 🍁 Mastering Stitch in the Ditch with CS7 from gammill.com.
Stitch-in-the-ditch hides the thread right in the seams between fabric pieces. Before quilting, the seams may look plain, but after quilting the blocks hold their shape better and feel more finished.
This method is neat, simple, and helpful for people who want the fabric print to stay the star. It uses little thread and works well for quilts made on a budget. A steady hand and careful seam following make the biggest difference.
For a custom twist, stitch only some seams and leave others open for a mixed effect. Many quilters still love this classic style because it gives support without shouting for attention.
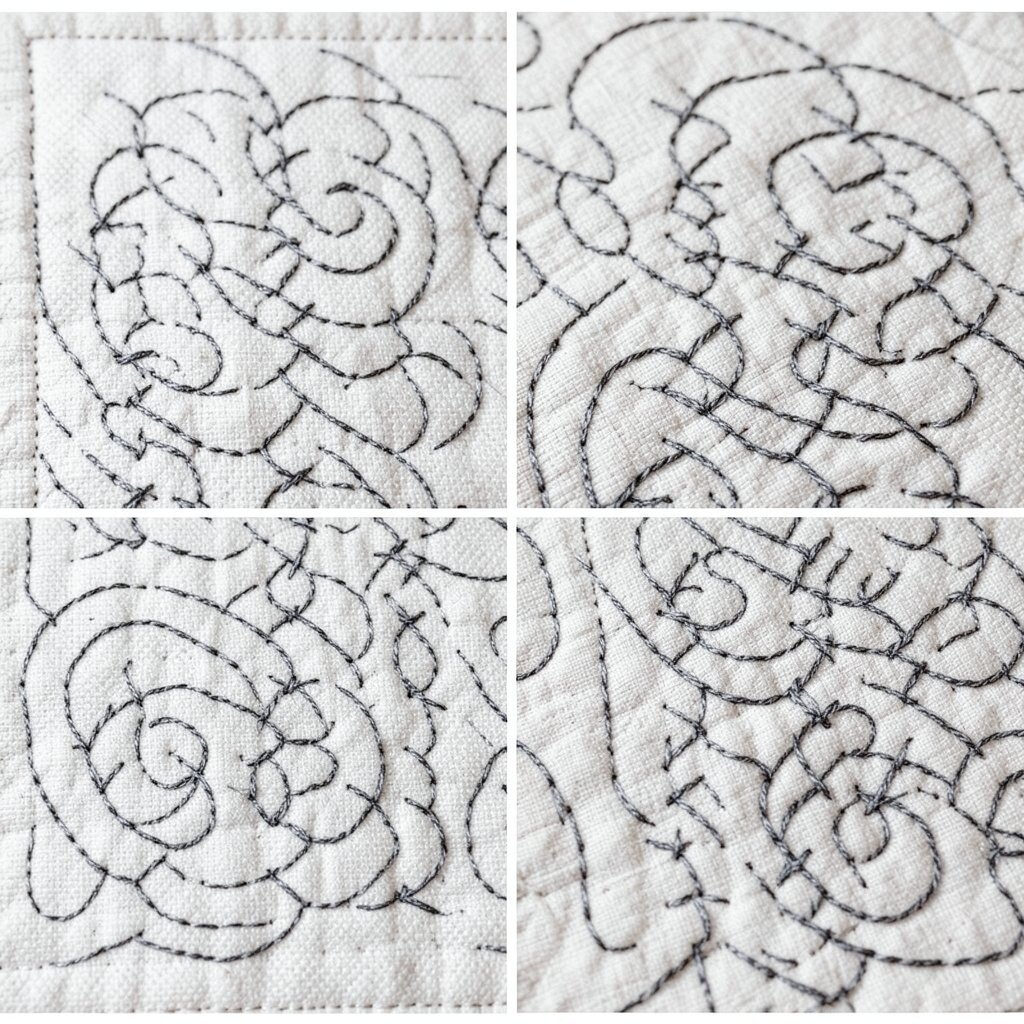
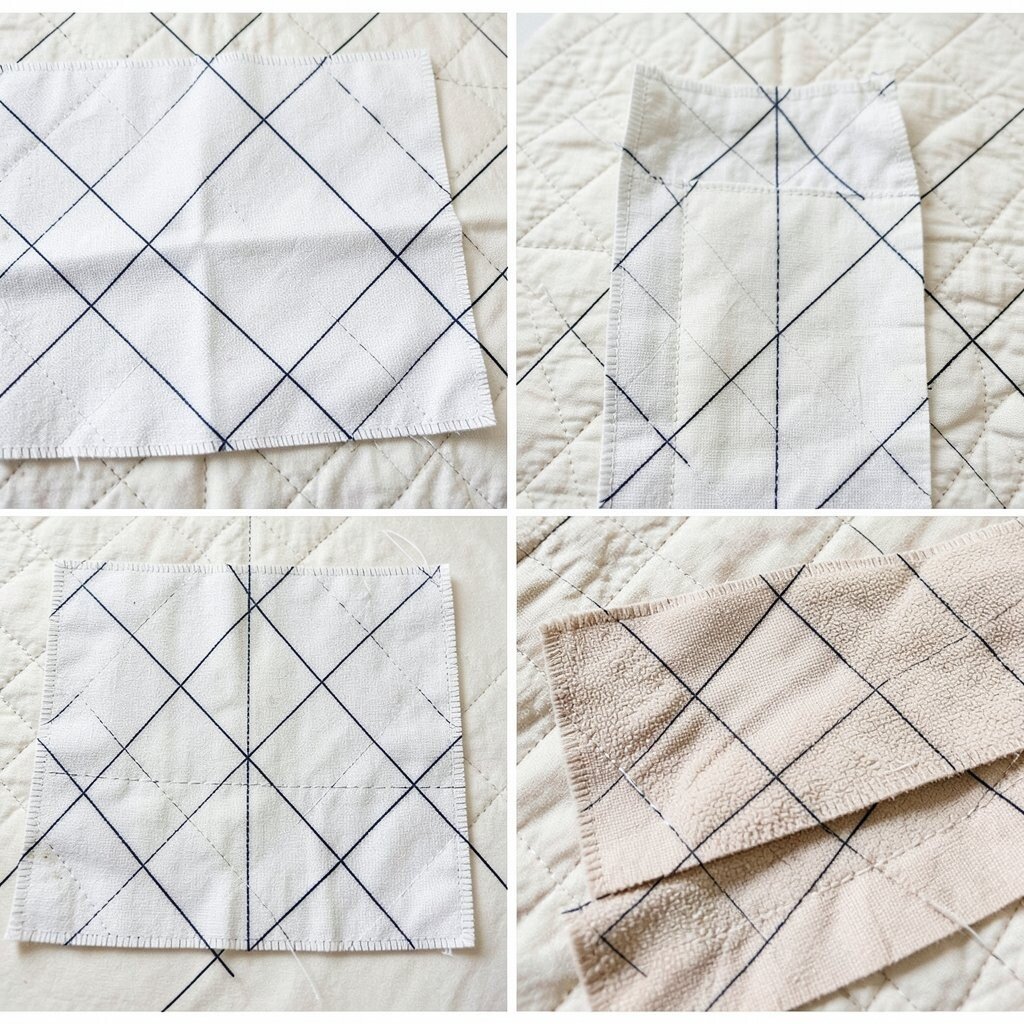
6. Spiral Stitching
Top Spiral Stitching Craft Tutorials
- 🍅 Free Russian Spiral Tutorial – Wrangling a Six-Color Spiral from wescottjewelry.com.
- 🍅 Variation 5: Spiral Trellis | Tortoise Loft – the blog from suetortoise.wordpress.com.
- 🧑🌾 Russian Spiral Rope Stitch Tutorial from thesprucecrafts.com.
- 💅 How to Do 6 String Spiral Lanyard from tiktok.com.
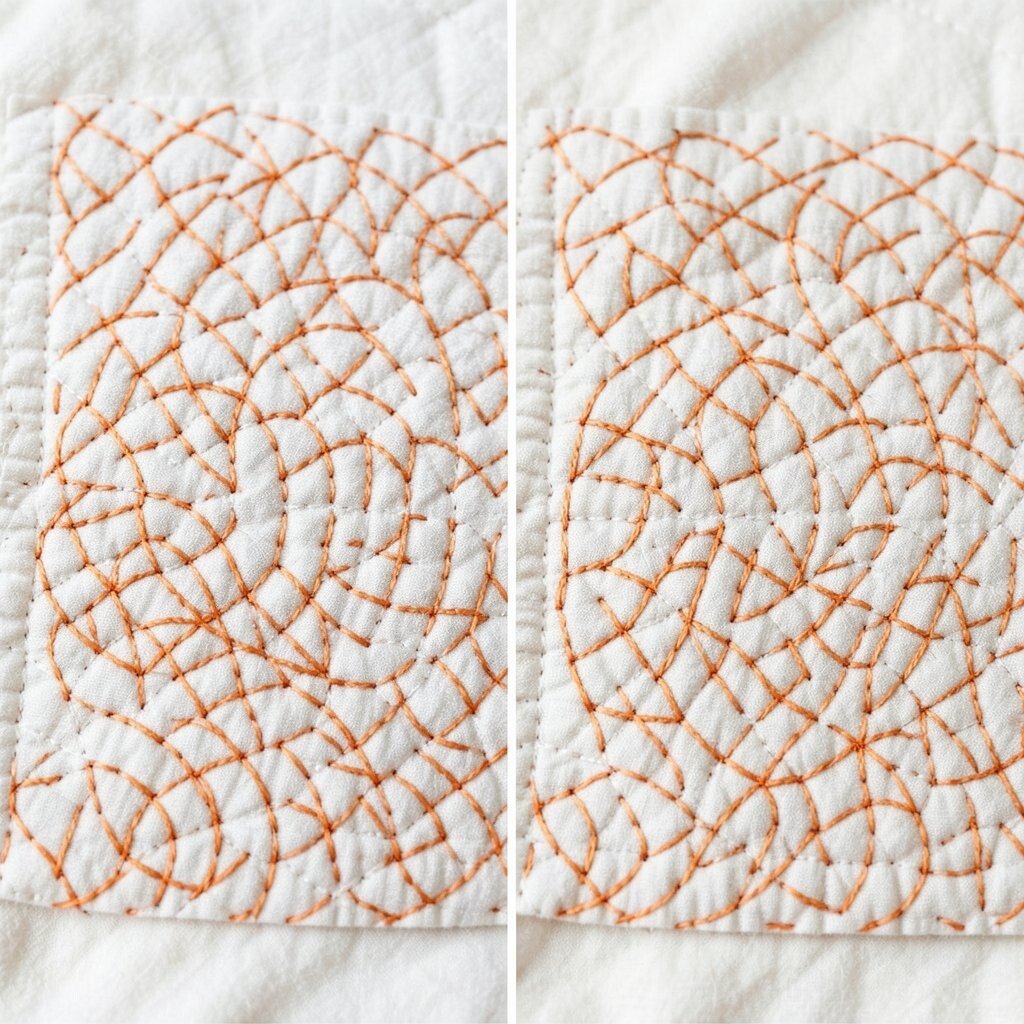
Spiral stitching swirls outward from a center point and creates a fun, spinning look. Before quilting, the area may seem still, but after quilting it feels full of energy.
This pattern works well on squares, circles, and even large open spaces. It can make a quilt feel playful and modern, especially when used with bright fabric. The design may take practice, yet it does not need expensive tools to look impressive.
Change the spiral size to fit the mood of the quilt, from tiny and tidy to wide and bold. If you want a fresh trend, try spirals in just one part of the quilt for a surprise accent.
7. Grid Quilting
Top Grid Quilting Craft Tutorials
- 🍂 How to Sew the Super Easy 7-Grid Chain Quilt Block from fabric406.com.
- 🍅 How to draw a 7 grid pattern with 3.25 inch squares and … from facebook.com.
- 🧑🌾 9 Easy Grid Quilting Ideas for Beginners from quiltingwemple.com.
- 🍅 How to make your own Grid Foundation for Quilts from patchworkposse.com.
- 🍅 TenSisters Handicraft | TenSisters Handicraft–quilting by … from tensisters.com.
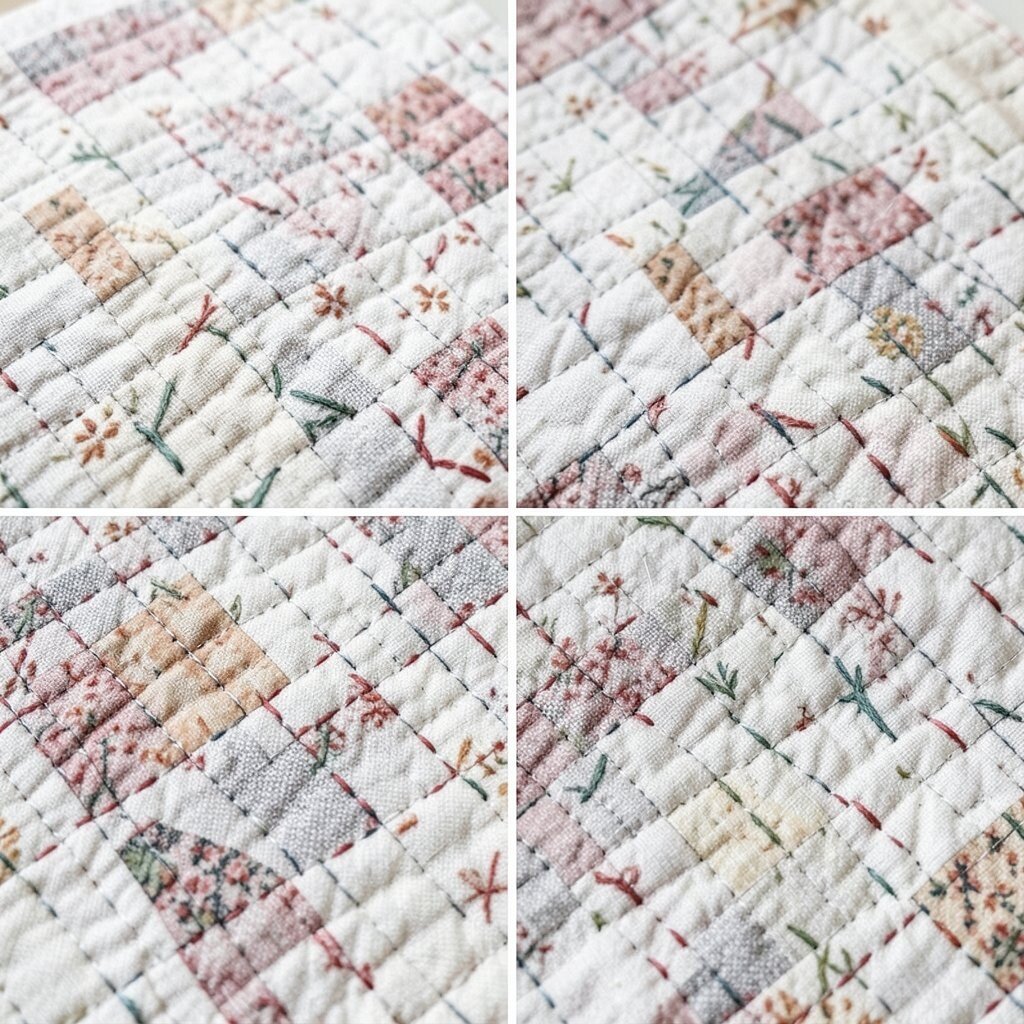
Grid quilting uses straight lines in a clean pattern that can be square or diamond shaped. Before quilting, the top may feel soft and loose, but after quilting it looks organized and strong.
This style is great for modern quilts and simple patchwork because it gives a calm, neat finish. It can be marked with tape or a ruler, which makes it easier to plan and keeps costs down. The repeated lines also help a quilt drape nicely on a bed or sofa.
You can make the grid larger for a light touch or closer for a more tailored feel. Many quilters like to use bold thread here because the lines become part of the design.
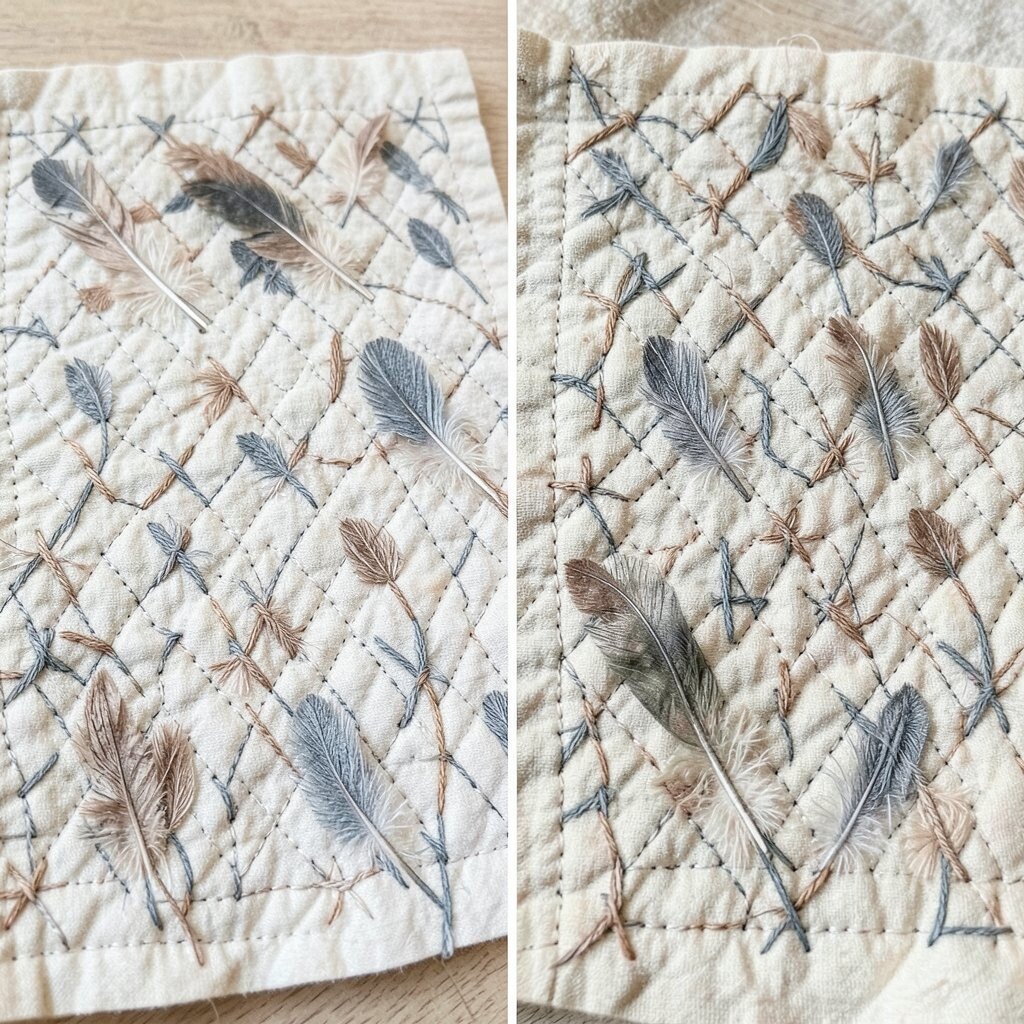
8. Feathers
Top Feathers Craft Tutorials
- 👓 Goose Craft Feathers 7-8" – 12 pcs – Fire Mix from featherplace.com.
- 🎄 8-12” Craft Feathers for Hats, Decor & DIY from ebay.com.
- 🧑🌾 Goose Feathers 7-8" – 12 pcs – Black and White from zuckerfeather.com.
- 🍂 24Pcs 8-10inch Feathers for Crafts,Party Centerpieces … from walmart.com.
- 💅 25pcs Natural Ostrich Feathers Craft 8-10 Inch (20-25 cm) … from amazon.ae.
Feather quilting brings soft, leaf-like curves that feel graceful and fancy. Before quilting, a border or block may look plain, but after quilting it can seem rich and elegant.
This pattern is a favorite for special quilts, wedding gifts, and heirloom pieces. It takes practice, yet even simple feathers can look lovely and add a lot of value to the quilt. If you are watching costs, use feathers in only one area instead of across the whole top.
Try them in borders, medallions, or around a center block for a personal touch. Feather designs stay popular because they can feel old-fashioned or modern, depending on the shape and spacing.
9. Orange Peel Curves
Top Orange Peel Curves Craft Tutorials
- 🍁 Orange Peel Quilting Design — Blog from sharonhollanddesigns.com.
- 💅 Piecing Orange Peel Blocks – a photo tutorial from patchwork-quilting.co.uk.
- 🍁 Introducing the Orange Peel Sew Along from thecraftyquilter.com.
- 🍂 Tips for perfect orange peels on a medium panel from facebook.com.
- 🍅 Easy Quilt Block Tutorial: the Orange Peel … from sewcanshe.com.
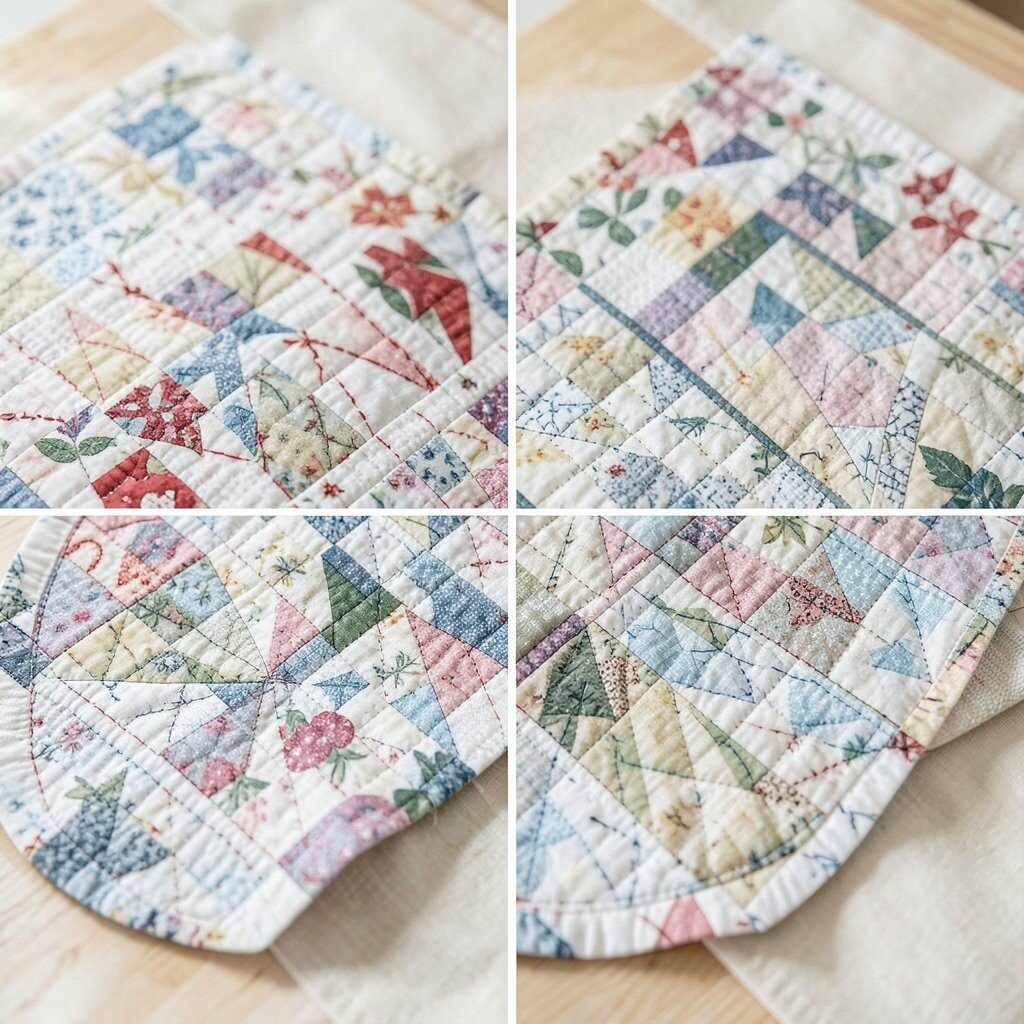
Orange peel curves make soft oval shapes that repeat across the quilt like petals. Before quilting, the fabric may seem flat, but after quilting the surface gains a gentle, flowing texture.
This pattern looks beautiful on solid fabrics because the stitches become easy to see. It also works well with vintage-style quilts and can add a sweet, handmade feel. The curve shape may need a bit of marking, but the supplies are usually simple and affordable.
Try filling each peel with a tiny echo line or leave them plain for a cleaner look. Many makers enjoy this design because it feels both classic and fresh.
10. Clamshell Stitching
Top Clamshell Stitching Craft Tutorials
- 🗺️ The Clammy 10" Clamshell Quilting Template from 123stitch.com.
- 🍅 How to Sew Clamshells Using the EPP (English Paper … from maandmedesigns.com.
- 🖼️ How to Quilt Easy Clamshells with a Ruler and Without from sewcanshe.com.
- 🗺️ Mary's Clamshells – Sunny Day Supply from sunny-day-supply.myshopify.com.
- 🖼️ easy applique Clamshells from Circles from stitchedincolor.com.
Clamshell stitching creates rows of overlapping curves that look like scales or little shells. Before quilting, the surface may feel open and simple, but after quilting it becomes rich and textured.
This pattern is a smart choice for backgrounds, borders, or whole-cloth quilts. It can make a quilt feel soft and balanced, and it gives good coverage without needing fancy thread. Some quilters mark the shapes first, which adds a small cost for tools but can save time later.
For a custom look, switch the direction of a few rows or use different thread colors. Clamshells are trending in both traditional and modern quilting because they add rhythm and calm.
11. Stitching Around Blocks
Top Stitching Around Blocks Craft Tutorials
- 🎄 Odd number quilt layout ideas for 11" blocks from facebook.com.
- 🗺️ Circles Block #11–EPP Sew-A-Long from opquilt.com.
- 🍂 How to Stitch in the Ditch from kimberbell.com.
- 🍁 15 Stitches Every Embroiderer Should Know from thesprucecrafts.com.
- 👓 Penny Patch: Assemble Blocks from stitchedincolor.com.
Stitching around blocks means outlining each patch or section so the quilt pieces stand apart clearly. Before quilting, the top may blend together, but after quilting each block gets its own voice.
This method is easy to plan and works well for beginners who want a tidy result. It also uses little thread and can be done without special feet or rulers in many cases. The finished quilt often feels more structured and ready for daily use.
Try outlining only the most important blocks if you want to save time and money. A bright thread can make the shapes pop, while a matching thread keeps the look soft.
12. Swirl and Hook
Top Swirl And Hook Craft Tutorials
- 🍅 Wonderart Shaggy 426307 Latch Hook Kit 12"X12 Tie Dye … from ebay.com.
- 💅 WonderArt® 12" x 12" Latch Hook Kit, Shaggy Small Tie … from walmart.com.
- 🍅 National Yarn Craft. Theoadorable Bear Latch Hook Kit … from ebay.com.
- 👓 Best Resin Crochet Hooks – Furls Crochet Swirl Streamline … from nickishomemadecrafts.com.
- 🖼️ LatchKits Unicorn Mini-Rug, 12 x 11 in from frysfood.com.
Swirl and hook stitching mixes curls with little hook shapes for a lively, flowing design. Before quilting, a plain area may seem calm, but after quilting it feels active and stylish.
This pattern adds movement and works well in open spaces that need a little drama. It can also soften sharp patchwork by giving the eye a place to rest. The cost stays low if you practice on scrap fabric first instead of buying extra tools.
Use larger swirls for a bold statement or smaller ones for a delicate finish. Many quilters like this look right now because it feels hand-drawn and artistic.
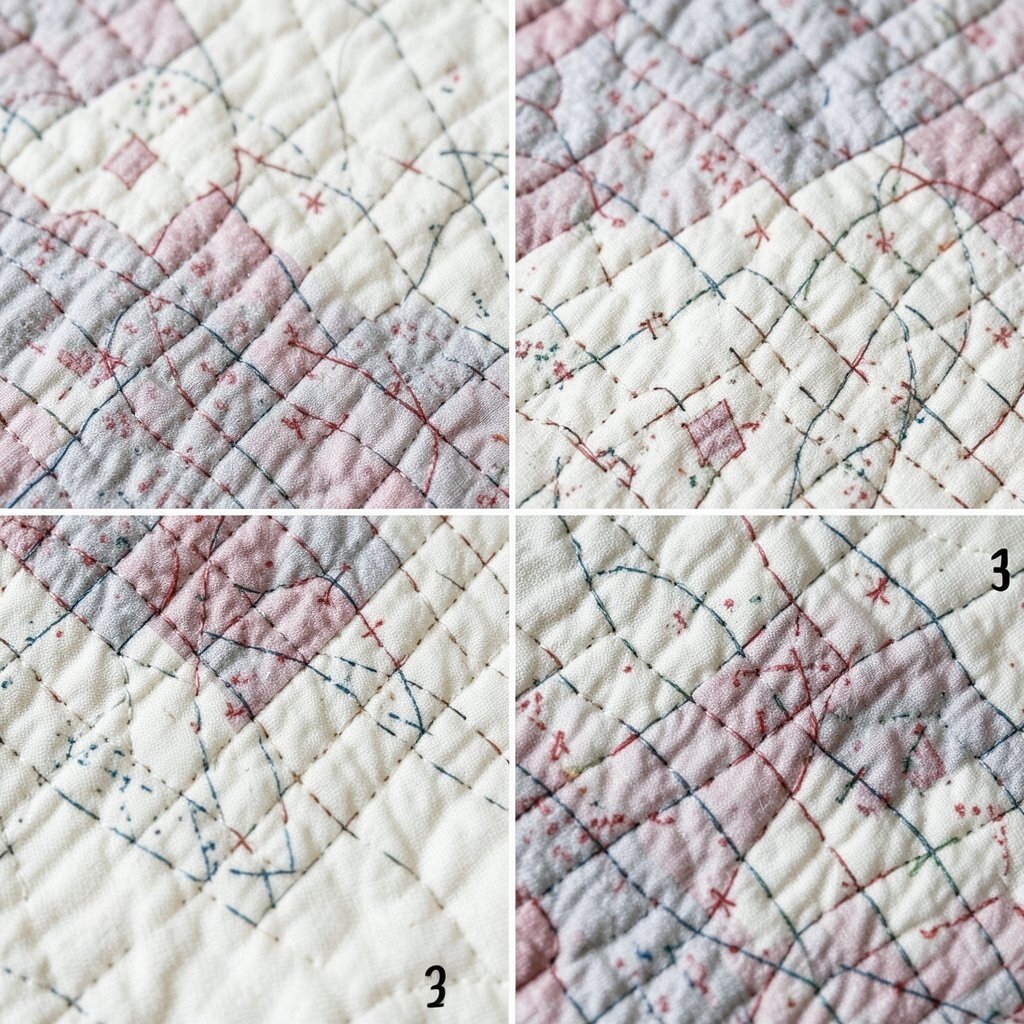
13. Grid with Diagonals
Top Grid With Diagonals Craft Tutorials
- 🖼️ Clarity Matters Blog Tutorial: Diagonal Circle Grid – Joy from claritymattersblog.com.
- 🎨 Parchment Craft Grids – A Guide from perfectparchmentcraft.wordpress.com.
- 🧑🌾 Thank you for the delightful diagonal grid lesson from facebook.com.
- 🍅 One of Samantha's favorite forms to throw are covered jars. This … from instagram.com.
- 👓 Diagonal movement distortion on a square grid from reddit.com.
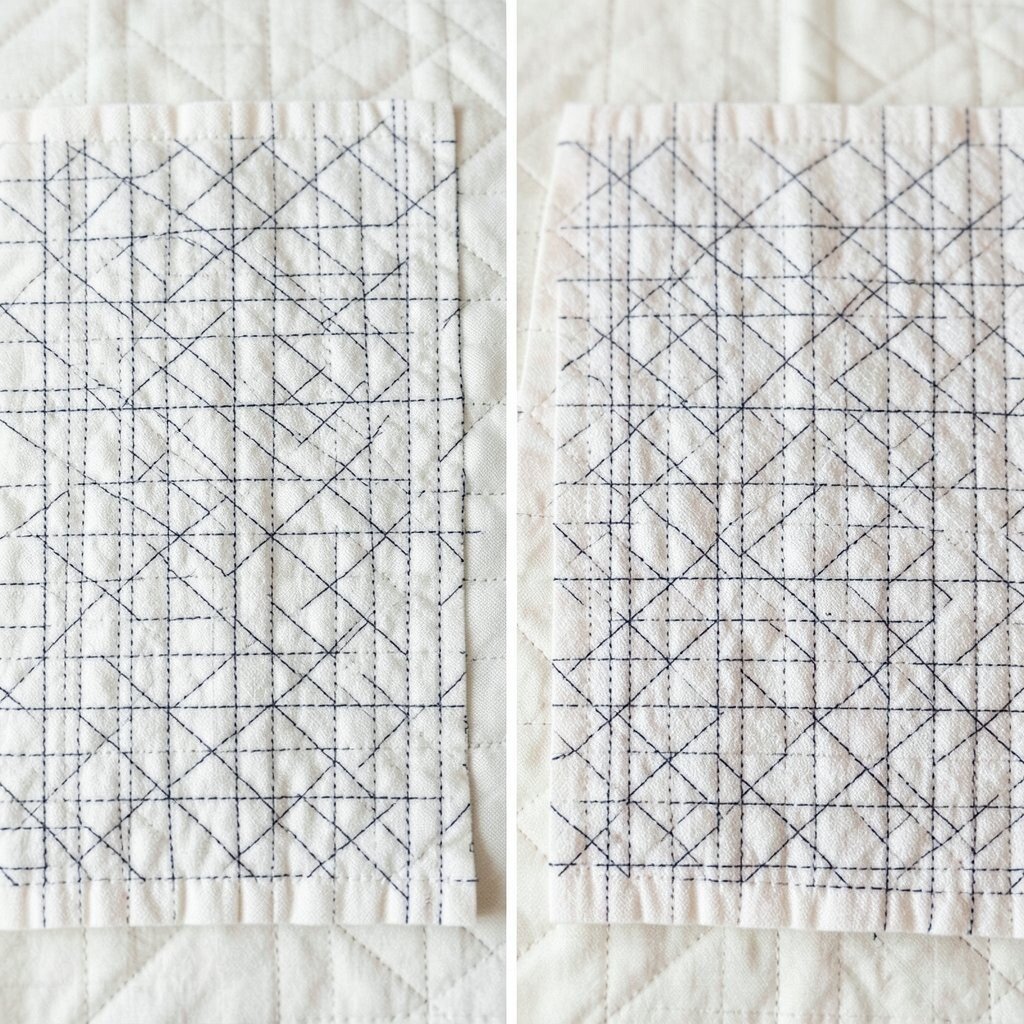
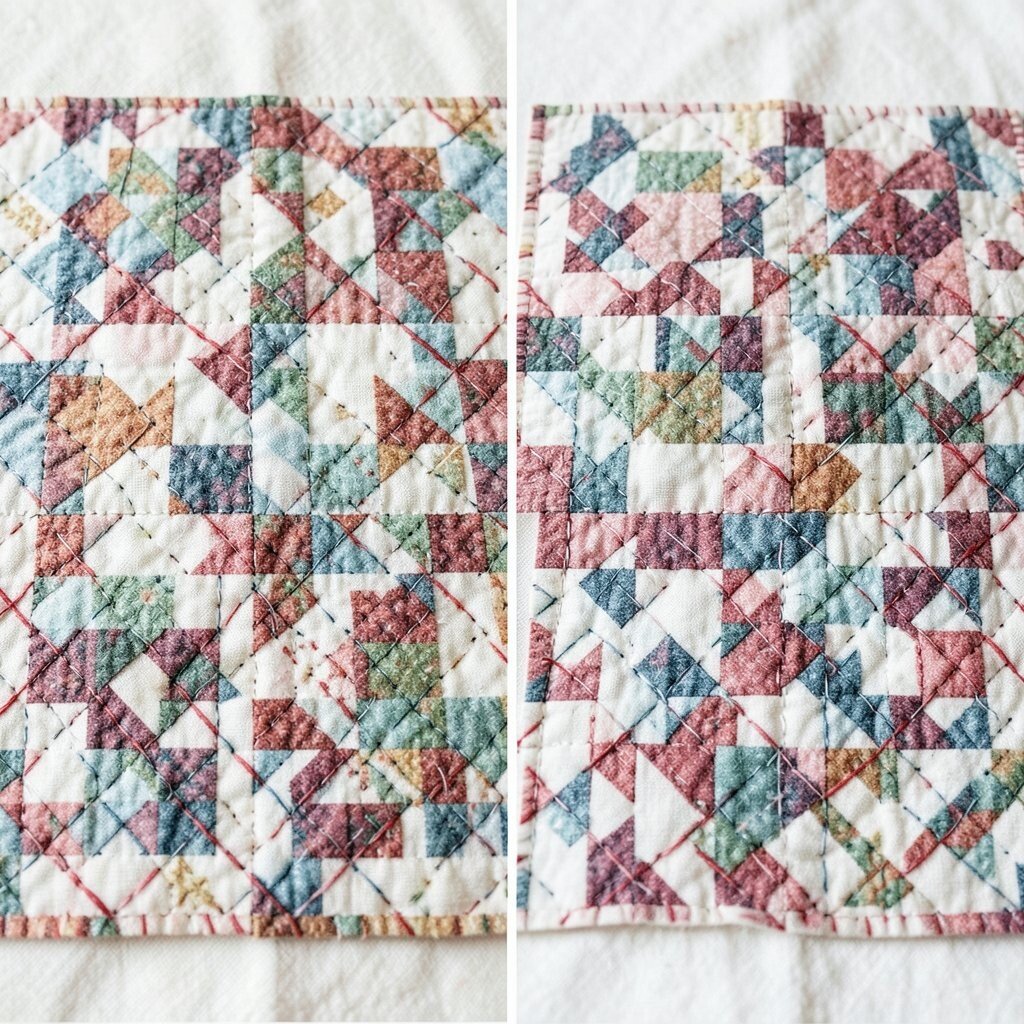
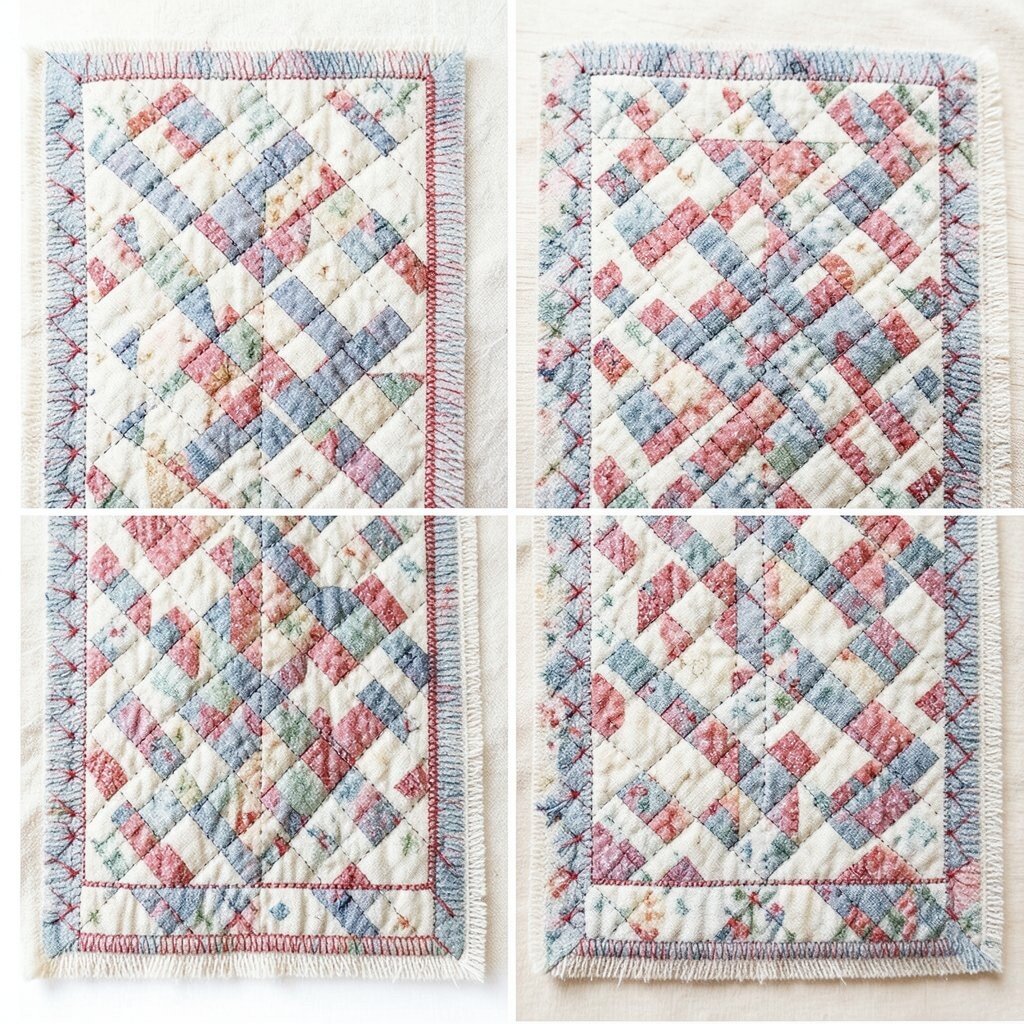
Grid with diagonals starts with a simple square grid and then adds angled lines for extra sparkle. Before quilting, the quilt may look tidy, but after quilting it gains a lively, starry feel.
This pattern is great for modern patchwork, especially when the fabrics have strong shapes. It gives more texture than a plain grid and can make even simple blocks feel special. Marking the lines carefully helps keep the design even, and that can prevent wasted thread and time.
Personalize it by changing the angle in certain blocks or by using contrasting thread. The result feels current and bold without becoming too busy.
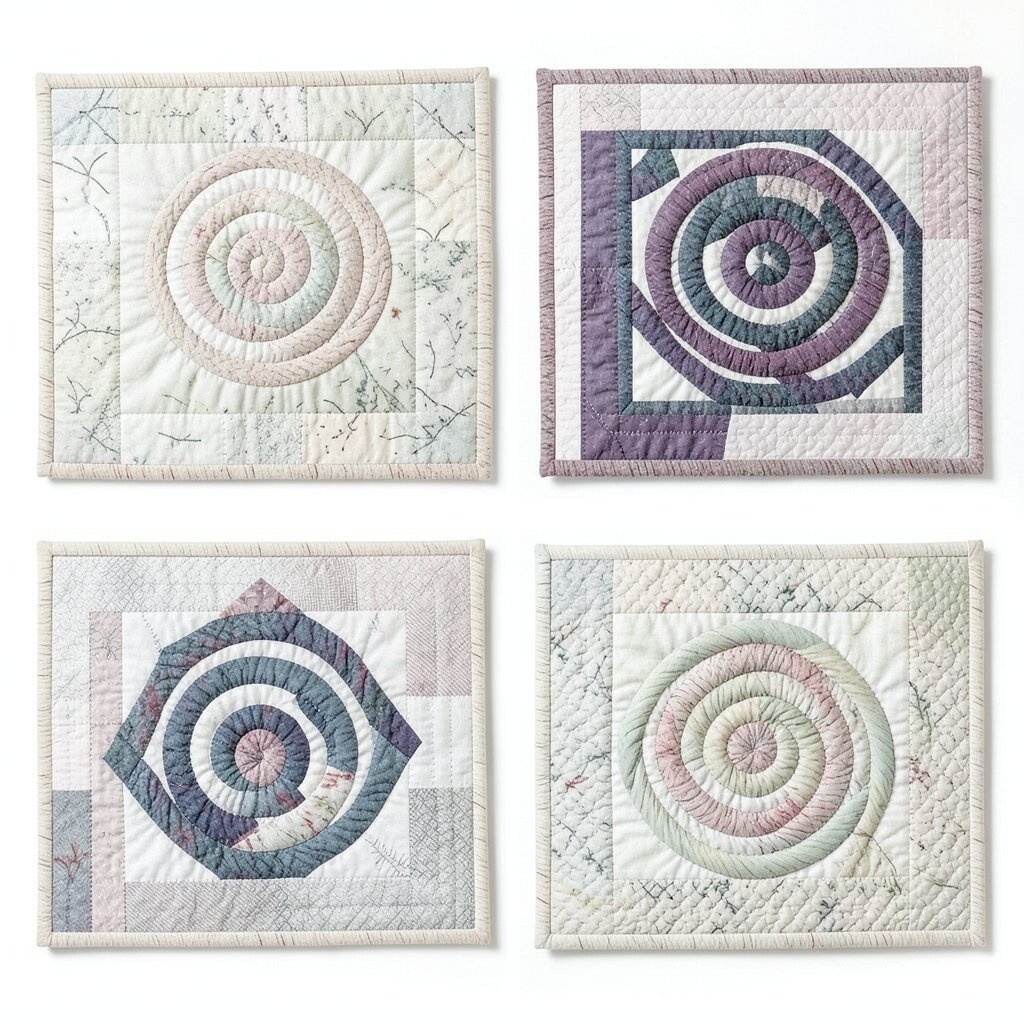
14. Spiral in the Square
Top Spiral In The Square Craft Tutorials
- 💅 Quilt Stitch Guide & Free Tutorials from anniesattic.com.
- 🖼️ Quilt Patterns and Tutorials for Beginners from seasonedhomemaker.com.
- 🍅 How to Make a Quilt | Quilting for Beginners from brother-usa.com.
- 🧑🌾 Quilting Patterns for Beginners from dutchlabelshop.com.
- 🖼️ Stitch Recipes: Finding Your Quilting Vibe from weallsew.com.
Spiral in the square places a swirl inside each block, turning plain shapes into little whirlpools. Before quilting, the quilt top may seem stiff, but after quilting the blocks feel alive and eye-catching.
This style is fun for patchwork quilts because it gives every square a clear finish. It also works well with bright prints, since the swirl helps guide the eye. The design is friendly to home machines and does not require costly supplies.
Try alternating spiral directions for a playful effect or keep them all the same for a calmer look. This is a good way to make a quilt feel custom without adding complicated piecing.
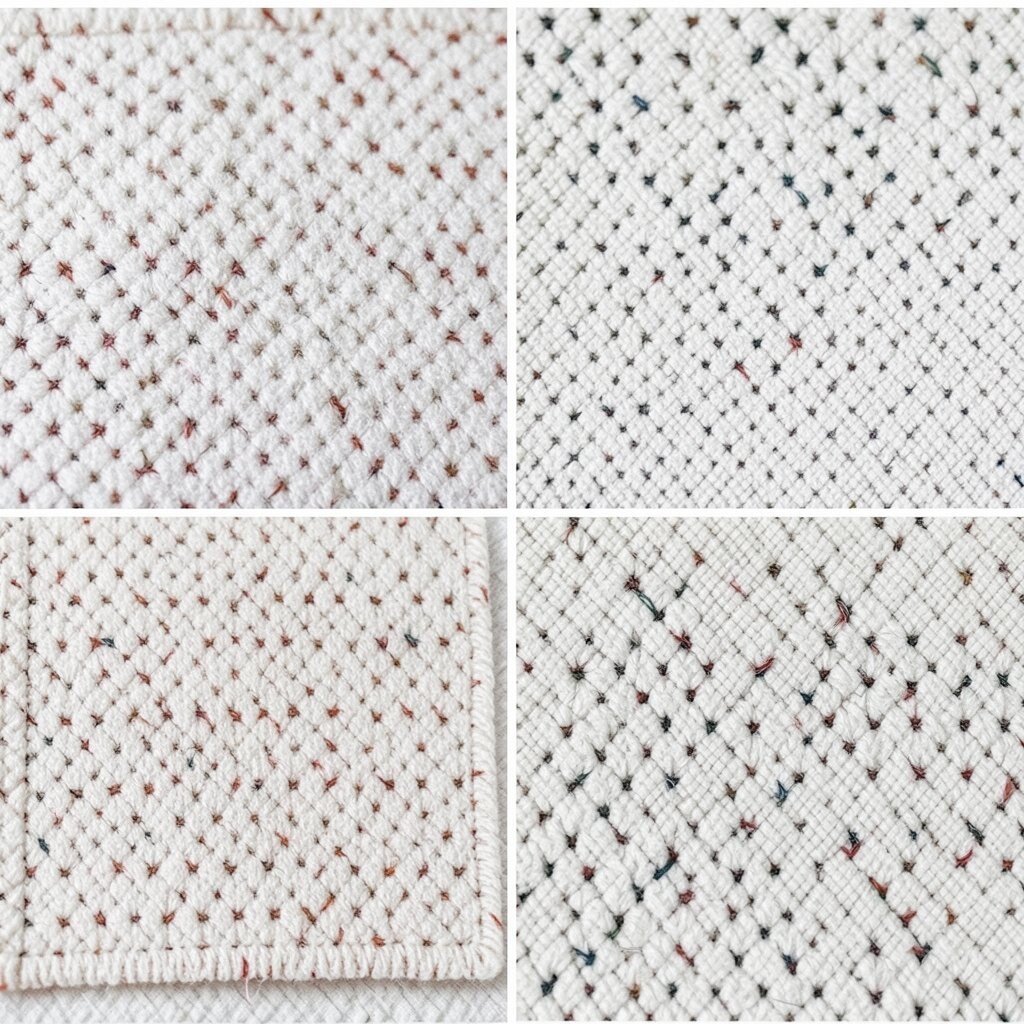
15. Dense Background Fill
Top Dense Background Fill Craft Tutorials
- 🍂 Dense quilting makes feathers pop in background from facebook.com.
- 🗺️ So excited to share my first Artisan Extra project of the year. … from instagram.com.
- 🧑🌾 how do you guys add black backgrounds to your tanks? from reddit.com.
- 🍅 2d flat 2d flat banner full coverage wall backdrop from temu.com.
Dense background fill packs tiny stitches into open areas so the main shapes can stand out. Before quilting, the top may seem flat, but after quilting the background becomes rich and the foreground looks sharper.
This method is perfect for art quilts, applique pieces, and quilts with bold centers. It adds a lot of texture and can make the quilt feel expensive and detailed. Because it uses more thread and time, it is smart to plan your budget before starting a large project.
Use a simple motif like tiny loops, dots, or curls to keep the work steady and personal. Dense fills are very popular now because they make quilts look gallery-ready.
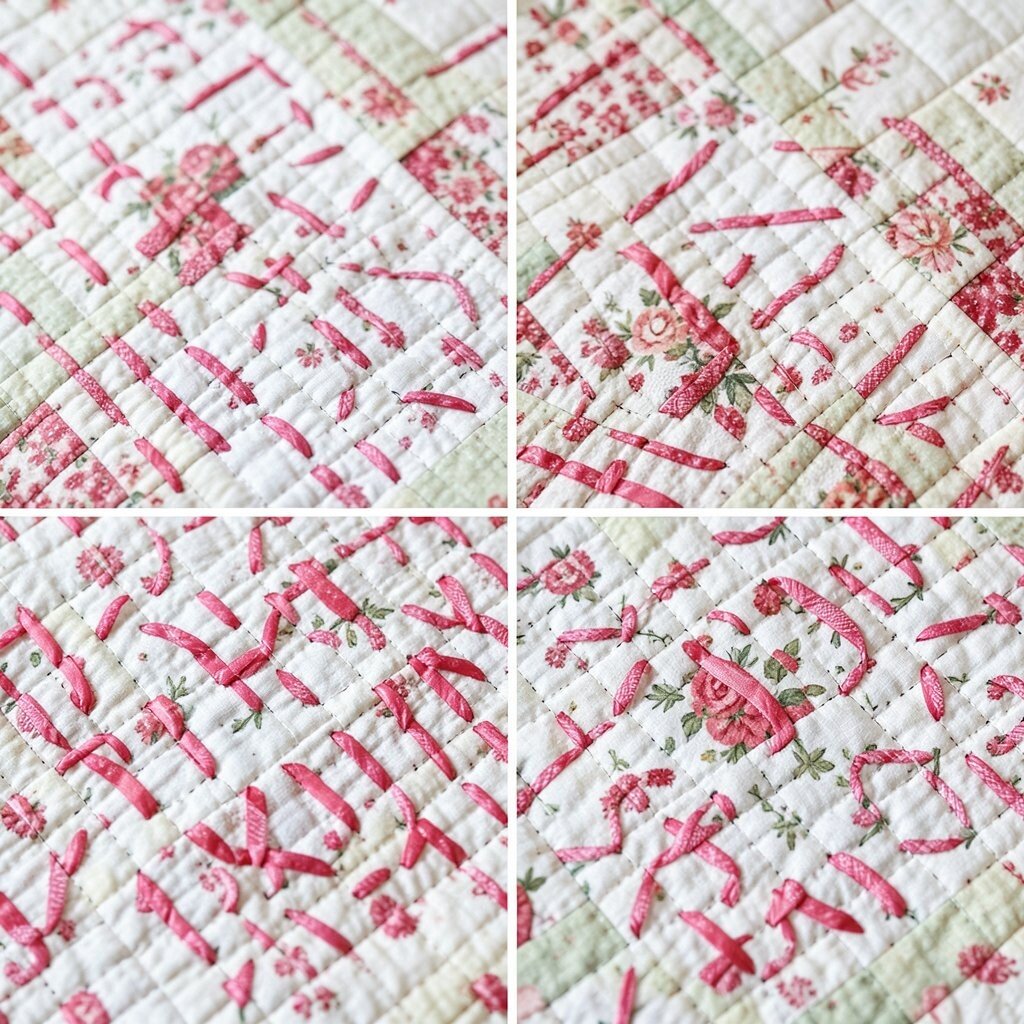
16. Ribbon Candy
Top Ribbon Candy Craft Tutorials
- 🧑🌾 16" Ribbon Candy Chenille Ball Pick from craftoutlet.com.
- 👓 Easy and quick ribbon candy recipe from facebook.com.
- 🖼️ 16" Sugared Ribbon Candy Spray – christmas from michaels.com.
- 🖼️ Ribbon Candy Felt Ornaments from purlsoho.com.
- 🍅 Fabric Ribbon Candy Ornament from craftystaci.com.
Ribbon candy stitching makes smooth, wavy lines that bend back and forth like folded candy strips. Before quilting, a border or sashing may look plain, but after quilting it feels cheerful and polished.
This pattern is a strong choice for borders because it fills space quickly and looks neat from far away. It also adds motion without making the quilt too busy. A washable marking pen can help guide the path, and that is usually an inexpensive supply.
Try wider waves for a soft feel or tighter waves for more energy. Many quilters like ribbon candy because it gives a classic finish with a fun twist.
17. Baptist Fan
Top Baptist Fan Craft Tutorials
- 🧑🌾 Baptist Fan Hand-Quilting | A Tutorial from patchworkandpoodles.com.
- 🎨 Part #2: Learning How to Make Freehand Baptist Fans For … from quiltyfolk.blogspot.com.
- 🍂 Baptist Fan Quilting – Home Sweet Dreaming from homesweetdreaming.com.
- 🗺️ FMQ samples – part 11 – tutorial BAPTIST FANS … from ipatchandquilt.wordpress.com.
- 🍂 Hand quilting a Baptist fan pattern freehand from facebook.com.
Baptist fan quilting uses repeating fan shapes that spread across the quilt in a gentle rhythm. Before quilting, the surface may feel simple, but after quilting it looks timeless and full of grace.
This pattern is a strong fit for vintage quilts, reproduction fabrics, and traditional bed quilts. It gives a lot of texture while still feeling calm and orderly. Some makers mark the arcs by hand, which takes time but keeps the supply cost low.
Personalize the size of the fans to suit the quilt, from small and subtle to large and bold. The style remains popular because it brings old-world charm without feeling stiff.
18. Pebbles with Paths
Top Pebbles With Paths Craft Tutorials
- 👓 Anyone have extra pebbles? need it to craft and finish my … from facebook.com.
- 💅 Building a Pebble Mosaic Stepping Stone from jeffreygardens.blogspot.com.
- 👓 Pebble Garden Ideas for a Low-Maintenance Space – Extra from billyoh.com.
- 🍁 To craft a visually stunning and functional outdoor space pebble … from instagram.com.
Pebbles with paths combines tiny round stitches with narrow open channels that guide the eye. Before quilting, the area may seem plain, but after quilting it has a playful mix of texture and space.
This design is useful when you want some parts to feel busy and others to breathe. It can make a quilt look carefully planned and very personal. The pattern may take more time than simple lines, so it is wise to think about labor cost before starting a huge quilt.
Use the paths to frame a name, a date, or a favorite fabric print. The mix of soft pebbles and clean lanes feels fresh and very current.
19. Free-Motion Doodles
Top Free-Motion Doodles Craft Tutorials
- 🍁 Quiltlet designs created with free motion doodling from facebook.com.
- 👓 Creative Free-Motion Techniques: From Doodle to Design from craftandhobby.com.
- 👓 Free motion quilting doodle Dolls by Claire Passmore from clairepassmore.weebly.com.
- 🍂 These Simple Free-Motion Quilting Designs Are Perfect for … from craftsy.com.
- 🎨 Doodle to quilt from piecedbrain.com.
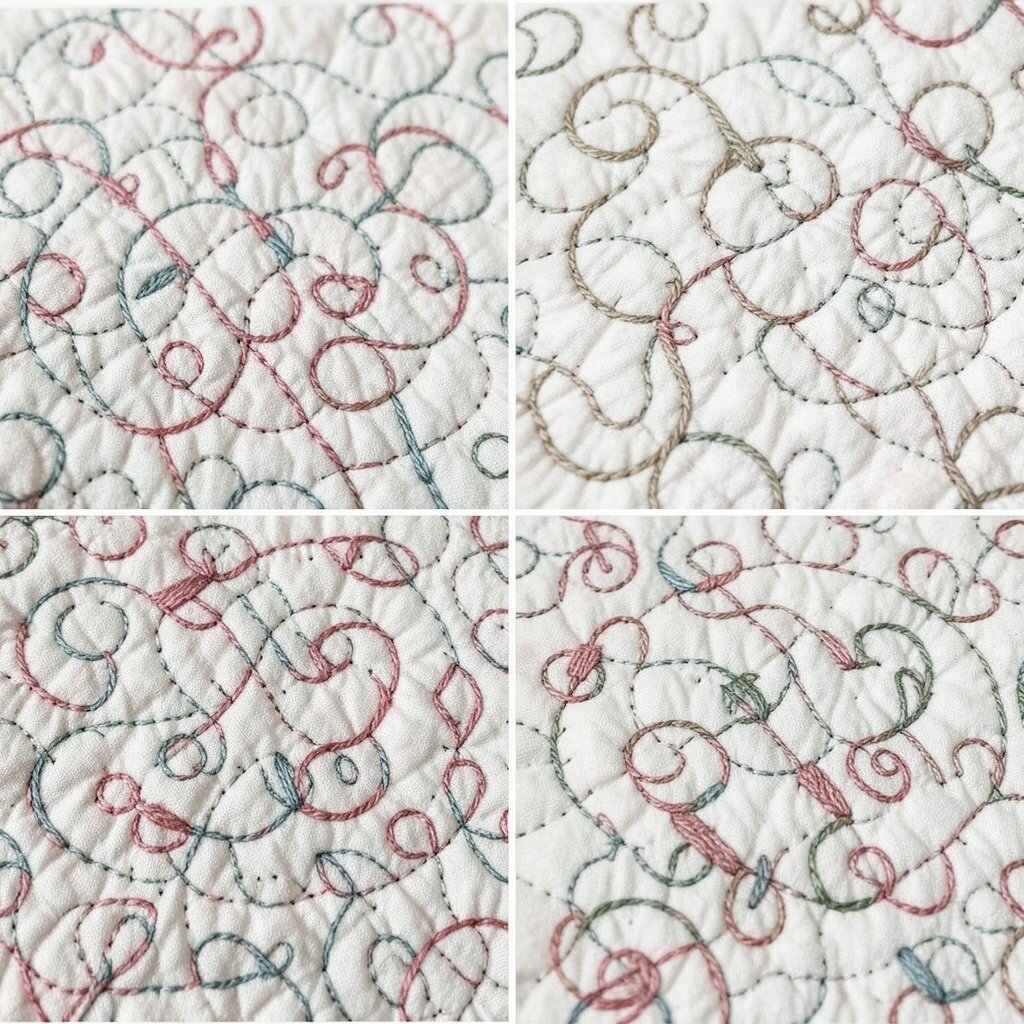
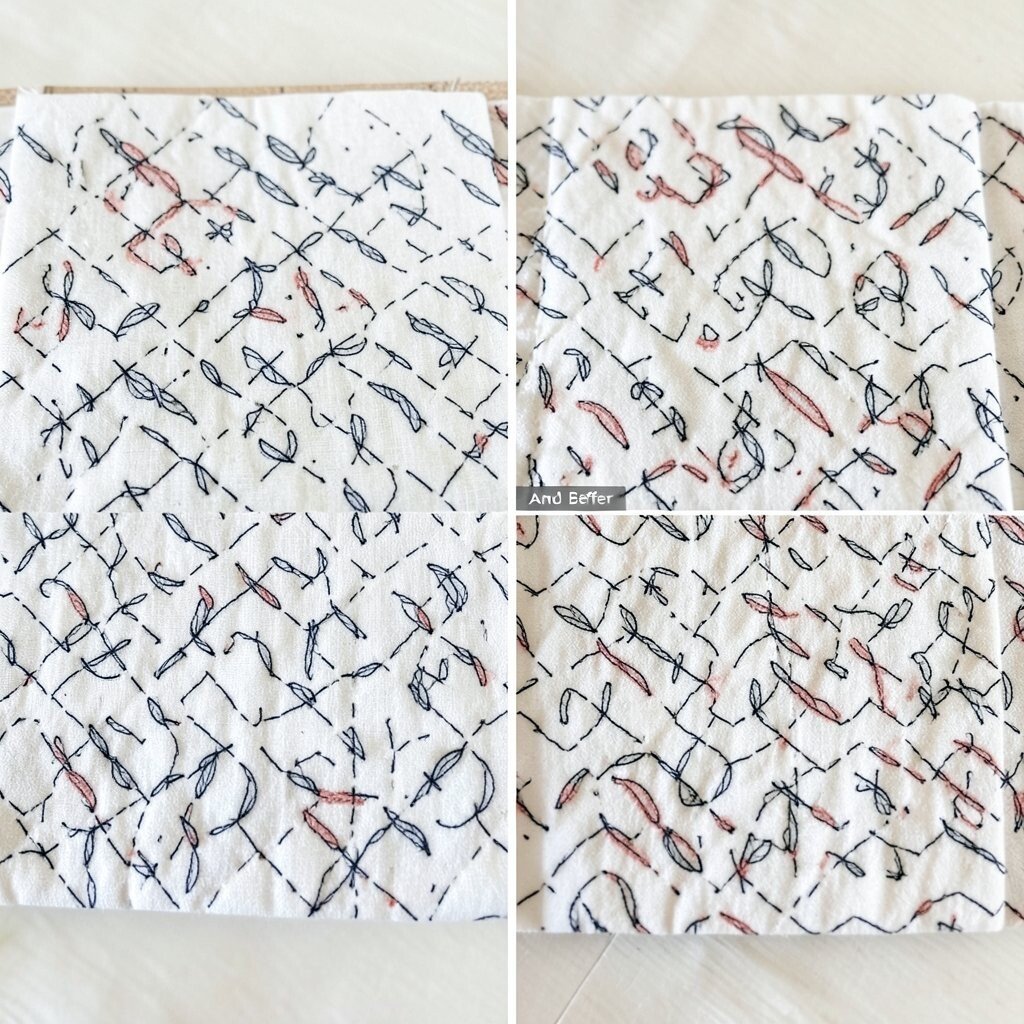
Free-motion doodles are loose stitch drawings that can look like vines, stars, leaves, or squiggles. Before quilting, the quilt top may feel quiet, but after quilting it becomes full of personality.
This style is one of the best ways to make a quilt feel one of a kind. It gives freedom to the maker and can be done with basic tools once the machine is set up for free motion. Since it uses imagination more than fancy supplies, it can be a budget-friendly favorite.
Try sketching a few shapes on paper first, then stitch them in open areas. Doodles are especially trendy for makers who like a relaxed, handmade look.
20. Border Focus Stitching
Top Border Focus Stitching Craft Tutorials
- 💅 20+ Crochet Borders and Edgings for a Professional Finish – from desertblossomcrafts.com.
- 🖼️ How to Crochet: Betty's Beautiful Border {Photo Tutorial} from lookatwhatimade.net.
- 🍅 Should I add a border to my quilt using focus fabric? from facebook.com.
- 🧑🌾 Needlepoint Border Stitch Ideas from instagram.com.
Border focus stitching puts the most detail around the edge so the center can stay calm and open. Before quilting, the quilt may seem unfinished, but after quilting the border frames everything like a picture.
This pattern is smart for large quilts because it gives impact without covering every inch with dense stitching. It can also save thread and time, which helps with cost on big projects. A bold border can make even a simple center feel special and complete.
Try feathers, swirls, or waves in the border to match the quilt style. Many quilters use this approach now because it gives a strong look while keeping the middle soft and cozy.