Crafting is about more than just the end result; it’s the journey of creation. When your crafting space is organized, that journey becomes even more enjoyable. These clever storage solutions might just spark your next big idea.
1. Mason Jar Organizers

Mason jars aren’t just for canning grandma’s preserves. They’re perfect for storing all those tiny craft supplies. Fill them with buttons, beads, or even paintbrushes.
The see-through glass means you can spot what you need in a flash. Mount them on a board for an adorable wall display. It’s rustic, charming, and oh-so-functional!
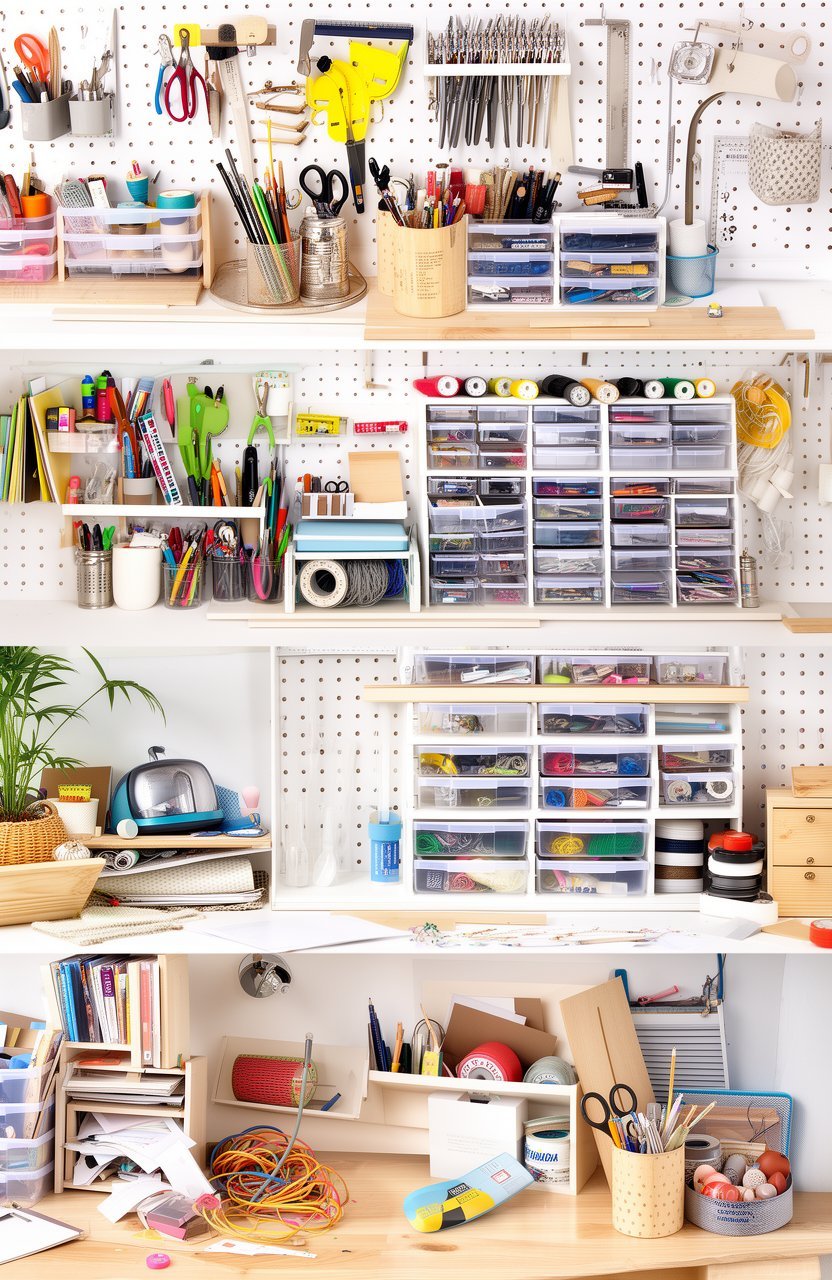
2. Pegboard Craft Wall

A pegboard isn’t just for tools in the garage. Transform it into a colorful craft display. Paint it in your favorite color to add a pop of personality.
Hang scissors, ribbons, and other supplies for easy access. This keeps everything visible and reachable, perfect for spontaneous crafting sessions.
3. Vintage Suitcase Storage

Got an old suitcase lying around? Turn it into a chic storage solution. Line it with fabric and add dividers to keep things tidy.
Not only does it hide away your clutter, but it also adds a unique vintage touch to your room. Plus, you can easily close it up and carry it away if needed!
4. Rolling Cart

A rolling cart is a crafter’s best friend. Stackable and mobile, it goes wherever your creativity takes you.
Organize supplies by project on each tier. Decorate it with stickers or paint for a personal flair. It’s like having a mini studio on wheels!
5. Hanging Shoe Organizer

Repurpose a hanging shoe organizer for your craft supplies. Those pockets are perfect for yarn, fabric scraps, or even colorful markers.
Hang it on the back of a door to save space. You’ll love how it keeps everything within arm’s reach but out of the way.
6. Spice Rack for Glitter

Transform a spice rack into a glitter paradise. Fill each jar with a different shade to create a rainbow of sparkles.
Mount the rack on the wall for easy access and dazzling display. It’s a glitter lover’s dream come true!
7. Fabric-Covered Storage Boxes

Use fabric to spruce up plain storage boxes. Choose patterns that match your room’s decor for a cohesive look.
These boxes can hold anything from fabric swatches to scrapbooking supplies. Stack them for a neat and tidy corner.
8. Ladder Shelf Display

Turn an old ladder into a stunning shelf display. Each rung becomes a shelf for baskets or boxes.
Paint it in bright colors or leave it natural for a rustic vibe. It’s an eye-catching way to showcase your crafting materials.
9. Magnetic Strip for Tools

Keep metal tools like scissors and pliers handy with a magnetic strip. Attach it to a wall or the side of a desk.
You’ll never lose your favorite tools again. Plus, it’s a sleek and modern storage solution.
10. Tin Can Caddy

Recycle tin cans into a handy caddy. Wrap them in colorful paper or fabric for a cheerful touch.
Group several cans together on a lazy Susan for a rotating supply station. It’s eco-friendly and efficient!
11. Bookcase Cubbyholes

Turn a bookcase into a craft storage haven by adding cubbyholes. Use baskets or bins to keep everything organized.
Label each cubby for easy identification. It keeps your space neat without sacrificing style.
12. Embroidery Hoop Wall Pocket

Make wall pockets with embroidery hoops and fabric. Hang them up to store small items like thread and needles.
It’s a quirky and creative way to keep your essentials at hand. Plus, it adds a touch of handmade charm to your space.
13. Pallet Shelving Unit

Repurpose a wooden pallet into a rustic shelving unit. Sand and paint it to match your decor.
It’s perfect for storing fabric, paper, and other bulky items. A cost-effective and eco-friendly option!
14. Cookie Jar Button Storage

Store buttons in clear cookie jars for a sweet display. You’ll love how colorful and fun it looks on your shelf.
Each jar can hold a different type or color of button. It’s as delightful as it is useful!
15. Hanging Basket System

Install a series of hanging baskets for vertical storage. They’re great for holding rolls of ribbon or yarn.
Hang them in a row for a tidy look. It’s a space-saving solution that keeps everything within view.
16. Chalkboard Label Jars

Use jars with chalkboard labels for versatile storage. Change the labels as your needs change.
Store anything from beads to buttons in style. It’s practical and adds a personal touch to your space.
17. Drawer Organizer Dividers

Add dividers to your drawers for better organization. No more rummaging around to find what you need.
Use them for thread, scissors, and other small supplies. Customize the layout to fit your specific storage needs.
18. Yarn Storage Pegs

Install pegs on a wall for yarn storage. Display your yarn in a colorful rainbow.
It keeps yarn untangled and easy to access. A vibrant and practical display for any knitting enthusiast!
19. PVC Pipe Marker Holders

Cut PVC pipes into short segments for marker holders. Mount them on a board for an organized display.
Paint the pipes for a pop of color. It’s a creative and cost-effective solution!
20. Wine Rack for Ribbon

Repurpose a wine rack as a ribbon holder. Slide spools onto the rods for easy access.
It’s a chic and unexpected way to store ribbons. Plus, it keeps them tangle-free!
21. Vintage Crate Shelving

Stack vintage crates for a rustic shelving unit. Use them to store fabric, paper, and other craft supplies.
Leave them natural or paint them for a pop of color. A perfect blend of style and function!
22. Magnetic Spice Tins for Sequins

Use magnetic spice tins for sequin storage. Stick them to a magnetic board for easy access.
Each tin can hold a different color or style of sequin. It’s a sparkling solution for any sequin lover!
23. Plastic Bin Tower

Stack plastic bins for a tower of storage. Use clear bins to see what’s inside at a glance.
Label each bin for easy identification. It’s a practical and flexible storage solution!
24. Ribbon Curtain Rod

Install a curtain rod to hold ribbon spools. Slide them on and off with ease.
It’s a simple solution that keeps ribbons organized. Plus, it’s easy to set up and adjust as needed.
25. Upcycled Drawer Shelves

Turn old drawers into wall shelves. Paint them to match your decor for a cohesive look.
Use them to store small supplies or display finished projects. A charming and creative solution!
26. Tiered Cake Stand Organizer

Use a tiered cake stand for small item storage. It’s perfect for beads, buttons, and other tiny treasures.
Place it on your desk for a stylish display. It adds a touch of elegance to your crafting space!
27. Hanging File Folder System

Use a hanging file folder system for paper storage. Organize by color, pattern, or project.
It’s a neat and organized way to keep track of your paper supplies. Plus, it’s easy to flip through and find exactly what you need!
28. Slat Wall Organizer

Install a slat wall for ultimate customization. Add hooks, baskets, and shelves as needed.
You can change the layout as your storage needs evolve. It’s a dynamic and versatile solution!
29. Recycled Glass Bottle Storage

Use recycled glass bottles for storage. Fill them with beads, buttons, or other small items.
Display them on a shelf for a colorful and eco-friendly option. It’s a charming and sustainable solution!
30. Clipboard Wall Display

Attach clipboards to a wall for a creative display. Use them to hold patterns, inspiration, or ongoing projects.
It’s an easy way to keep your ideas visible and organized. Plus, it adds a unique touch to your crafting space!