
Clay changes under your hands in quiet, surprising ways. Each practice session leaves a mark you can see.
That is what makes sculpting so rewarding. Small choices build real skill, and every piece tells a story.
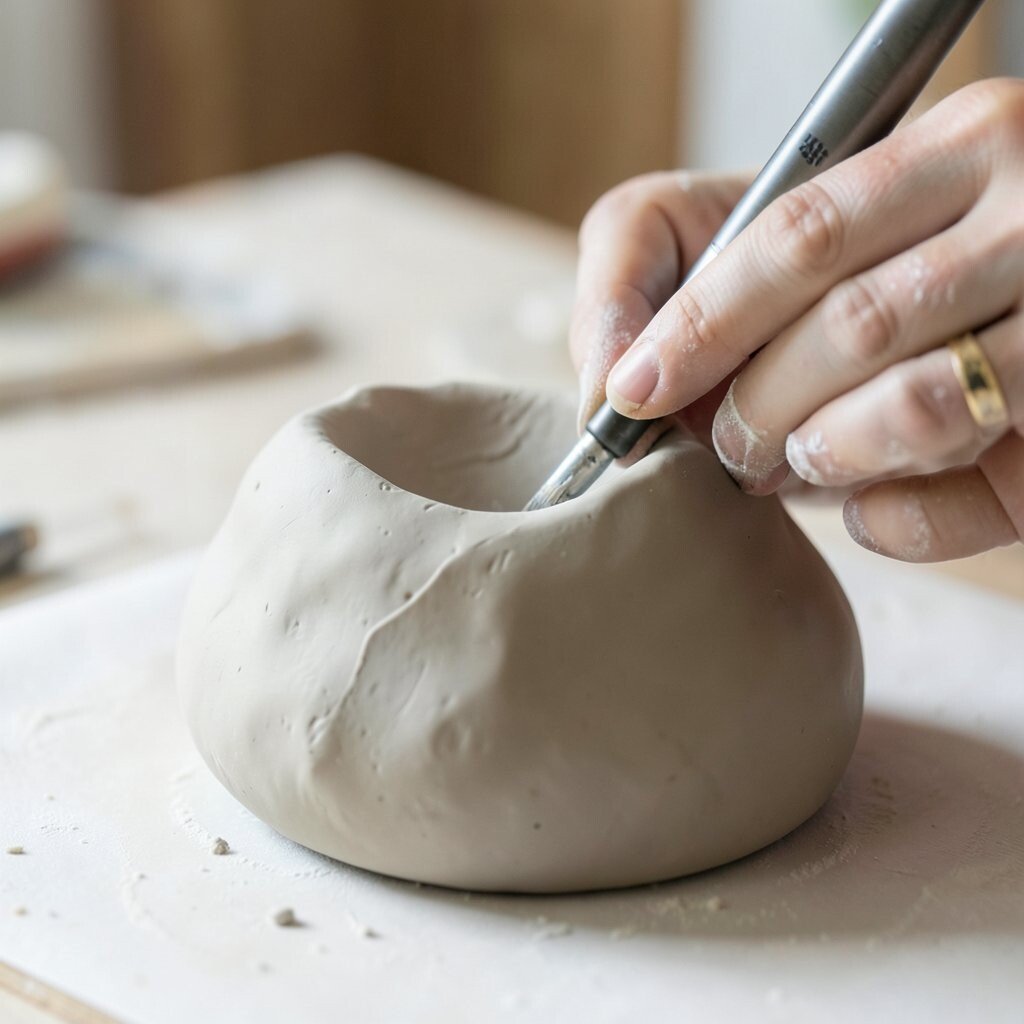
1. Start with Simple Shapes and Clean Edges
Top Start With Simple Shapes And Clean Edges Craft Tutorials
- 🎄 Dolittle Bean Mosaics Materials: – Scrap cardboard – White glue from facebook.com.
- 🗺️ 60 Fun Crafts to Do at Home for Kids and Adults from freddythefrogcaster.com.
- 💅 Turning simple shapes into shared art! Our young artists … from facebook.com.
- 🖼️ 51 Easy Art Projects for Kids & How to Make Them from eliserpeterson.com.
Round balls, short coils, and flat slabs may look plain at first. In clay, those basic forms teach your hands how to move with care.
When you shape simple pieces, you learn how moisture, pressure, and timing work together. This helps you save money too, because you can use less clay while you practice. Try making tiny bowls, smooth cubes, or little animals with very clear edges.
2. Practice Pinch Pots for Hand Control

Top Practice Pinch Pots For Hand Control Craft Tutorials
- 🍅 Ever made a pinch pot? They are super easy and a fun … from facebook.com.
- 🍂 How to Make a Pinch Pot at Home from soulceramics.com.
- 🍅 Simple Hand Made Ceramics — Fi Cooper Ceramics from ficooperceramics.com.
- 🎨 Introduction to Pottery Handbuilding & Throwing from alabamaart.com.
- 🍅 Easy Clay Pinch Pots for Beginners from lemon8-app.com.
Pinch pots are small, friendly projects that feel easy to start. They also show every thumb mark, so you can watch your progress closely.
Make one pot with soft sides and another with a sharper rim. That difference helps you see how much control your fingers are gaining.
You can personalize each pot with stamps, lines, or little dots pressed into the surface. Many makers like this style because it fits current trends for handmade, earthy home decor. Keep your walls even and your base thick enough so the pot dries without cracks.
3. Build Tiny Creatures for Shape Practice

Top Build Tiny Creatures For Shape Practice Craft Tutorials
- 🎄 Shape Monster Craft for Kids from livewellplaytogether.com.
- 🍁 Learn shape with a Shape Monster craft! Build some out of … from facebook.com.
- 🎨 15 Simple Minibeast Art and Craft Ideas for Early Years from earlyyearsresources.co.uk.
- 🗺️ 100+ Best Animal Crafts For Kids [With Templates] from simpleeverydaymom.com.
- 🍅 Tiny Wonders: Engaging Insect Craft for Kids from imthecheftoo.com.
Little animals, bugs, and fantasy figures make clay feel playful. They also train your eye to notice heads, legs, tails, and tiny details.
Start with a simple body, then add features one at a time. This slow method builds patience and helps you avoid wasting clay on rushed fixes.
Try giving each creature a different mood, like sleepy, proud, or curious. That personal touch makes every figure unique and more fun to keep on a shelf.
If you want a fresh look, use smooth surfaces on one piece and rough textures on another. This mix feels modern and keeps your practice lively.
4. Learn to Join Pieces Without Cracks

Top To Join Pieces Without Cracks Craft Tutorials
- 🎄 Kintsugi from en.wikipedia.org.
- 👓 Air dry clay shaping and joining tips needed from facebook.com.
- 🎄 9 Types of Wood Joints – The Best Methods for Joining Wood from learn.kregtool.com.
- 🎄 how to avoid cracks in foam clay when shaping? from facebook.com.
- 🖼️ Kitchener Stitch Tutorial: Seamlessly Graft Knit Stitches from purlsoho.com.
Joining clay parts is one of the most useful skills in sculpting. A strong seam can turn a simple shape into a cup, head, arm, or handle.
Score the surfaces, add slip, and press the pieces together gently. The seam should look neat, not bulky, so the finished work feels polished.
5. Make Faces to Study Expression

Top Make Faces To Study Expression Craft Tutorials
- 🍁 Free face expressions craft ideas download from facebook.com.
- 💅 Emotion Crafts from theottoolbox.com.
- 👓 DIY face expression craft | Facial Expressi… from instagram.com.
- 🗺️ Portraits of Our Feelings The artists of Junior 2 T have … from instagram.com.
- 🎄 50 Activities That Support Social-Emotional Learning from theartofeducation.edu.
Faces are full of tiny changes that show feeling. A lifted brow or a soft smile can make a clay head feel alive.
Practice with a round head first, then add eyes, nose, and mouth in simple steps. You will learn how small shifts change the whole mood of the piece.
Try making one face realistic and another more cartoon-like. That contrast teaches flexibility and helps you find a style that feels like your own.
6. Shape Leaves, Petals, and Natural Forms

Top Shape Leaves, Petals, And Natural Forms Craft Tutorials
- 🗺️ Creative Leaf Crafts for Kids: Nature's Art & Learning from imthecheftoo.com.
- 🍁 Nature Art for Kids: Crafts with Flowers, Leaves, and Rocks from kiwico.com.
- 💅 Beautiful leaf craft ideas for kids, parents and teachers Ctto from facebook.com.
- 👓 Green paper or stick (for stem) *Steps:* 1. … from facebook.com.
- 🍅 Aluminum Can Flowers and Leaves from greatstems.com.
Nature gives you endless clay ideas. Leaves, shells, flowers, stones, and seeds all have shapes worth copying.
These forms help you study curves, veins, and soft edges. They are also a low-cost way to practice, since you can make many studies from one block of clay.
Press real leaves into clay for texture, or carve veins by hand for a cleaner look. Many artists use nature-inspired pieces in home accents and jewelry trays because the style feels calm and current.
For a personal twist, try making a favorite plant from your own yard. That small detail can turn practice into something meaningful.
7. Try Texture Tools and Found Objects

Top Try Texture Tools And Found Objects Craft Tutorials
- 🍁 What random objects can be used to create texture on prints? from facebook.com.
- 🍁 Printmaking Art: 7 Printing Techniques for All Ages from artwithtrista.com.
- 🎨 of my favorite tools and materials for creating textured art! … from instagram.com.
- 🍁 What are your favorite unexpected tools for creating texture? from facebook.com.
- 💅 13 Art Ideas That Are Perfect to Take Outdoors from theartofeducation.edu.
A comb, sponge, fork, or lace scrap can leave exciting marks in clay. These tools add character without needing fancy supplies.
Texture work teaches you how surfaces catch light. It also helps you plan where smooth spots should stay quiet and where rough areas should stand out.
Make a sample tile with many textures on one surface. Then label the parts you like best so you can use them again in future pieces.
Personalize your work by mixing soft finger marks with tool-made lines. That blend often feels more handmade than a perfectly even finish.
8. Sculpt Small Hands and Feet for Proportion

Top Sculpt Small Hands And Feet For Proportion Craft Tutorials
- 🎄 Sculpting Tiny Hands from creativesculpture.com.
- 👓 How to sculpt doll or fairy feet, by Artisan Tony Rice – CDHM.org from cdhm.org.
- 👓 Show me how you make fingers and toes. I'm struggling. from facebook.com.
- 🎨 This is how real handmade miniatures begin ⤈ Sculpting … from instagram.com.
- 🧑🌾 Poseable Hand Armature For Paper Mache Clay from ultimatepapermache.com.
Hands and feet can seem tricky, but small practice pieces make them less scary. They also teach you how to judge size, balance, and position.
Start with blocky forms before adding fingers or toes. This keeps the shape strong and helps you avoid thin parts that break easily.
Use a mirror or a photo of your own hand to guide you. Many makers like this method because it makes the work feel more personal and realistic.
If you want a stylish look, keep the details simple and smooth. Clean shapes are popular right now in modern figurines and desk sculptures.
9. Work on Animal Poses and Movement

Top Work On Animal Poses And Movement Craft Tutorials
- 🖼️ Animal Yoga Poses for Kids – Fun & Easy … from eurokidsindia.com.
- 🍁 11 Yoga Poses for Toddlers & Preschoolers from totschoolresources.com.
- 🍅 23 Kids Yoga Poses That Make Mindfulness Fun from holisticmoms.org.
- 💅 These are so fun! Try out a few Arctic animal yoga poses 🐻 … from facebook.com.
- 👓 Animal Activities for EYFS (Early Years Foundation Stage) from ovivio.com.
An animal in motion brings energy to clay. A crouching cat, stretched bird, or hopping rabbit can teach you a lot about action.
Focus on the main body line first, then add legs, head, and tail. This helps the pose feel lively instead of stiff.
10. Create Relief Panels for Storytelling

Top Create Relief Panels For Storytelling Craft Tutorials
- 🎨 DIY Viral Wood Carving Waves – Fun Beginner Relief … from schaaftools.com.
- 🍁 The art of relief carving: techniques and tools including chisels from woodsculptingtools.com.
- 🖼️ Relief panel depicting Ramayana story from facebook.com.
- 🧑🌾 How to Make Stunning Art Pieces with Relief Paste and … from altenew.com.
- 💅 Crafting Stories in Clay: Relief Tile Artistry from slideserve.com.
Relief panels are flat works with raised shapes on top. They are great for telling a story, showing a scene, or practicing many forms at once.
You can place trees, people, animals, or symbols on one surface. This saves materials and gives you room to test composition without making a full sculpture.
Try a scene from a favorite book, a dream place, or a memory from home. That kind of personal subject makes the work feel special and keeps you interested longer.
For a fresh style, use bold outlines and simple shapes. Many makers like this look because it reads well on walls and fits current decor trends.
11. Make Tiles with Repeating Patterns

Top Make Tiles With Repeating Patterns Craft Tutorials
- 👓 How to Make a Repeating Pattern Two Ways from workovereasy.com.
- 🍂 How to Create a Seamless Pattern In Canva – Easy Tutorial … from jennifermaker.com.
- 🖼️ Einstein Tile Puzzle : 3 Steps from instructables.com.
Pattern tiles are calm to make and easy to repeat. They help your hands learn rhythm, spacing, and careful pressure.
Stamp stars, waves, leaves, or dots across the surface. Repeating the same motion again and again builds steady control over time.
Try one tile with a strict pattern and another with tiny changes. That small shift shows how a little freedom can make the work feel more alive.
12. Practice Hollow Forms for Better Structure

Top Practice Hollow Forms For Better Structure Craft Tutorials
- 🧑🌾 This was the first of the hollow forms that I had turned … from facebook.com.
- 🗺️ Woodturning: open bowls & hollow forms – W1017 from andersonranch.org.
- 🍅 Correct way to cut up small logs for bowls and hollow forms from aawforum.org.
- 🧑🌾 Woodturning natural edge hollow forms with plum or cherry … from facebook.com.
- 💅 Latest Raku inspired hollow form 300 mm diameter ( 12 inches … from instagram.com.
Big clay pieces need hollow space inside or they may crack. Learning this early saves time, clay, and frustration later.
Make a form, cut it open if needed, remove extra clay, and join it back together. This teaches planning and helps you think like a builder as well as an artist.
Keep the wall thickness even, and check for trapped air before drying. A careful hollow form often looks smoother and feels lighter in the hand.
13. Add Surface Carving and Line Work

Top Add Surface Carving And Line Work Craft Tutorials
- 🧑🌾 13 Easy Wood Carving Ideas Perfect for Beginners from schaaftools.com.
- 🖼️ Improving lino carving with thin, controlled lines from facebook.com.
- 🗺️ My Thin Lined Pattern Carving A video … from instagram.com.
- 🎄 C/6 Surface Development from ratcitystudios.com.
- 🖼️ Carving with Kids: Safe Wood Carving Projects for the … from schaaftools.com.
Carving gives clay a crisp, finished look. Lines can be soft and flowing or sharp and bold, depending on the mood you want.
Use carving to show feathers, hair, cloth folds, or simple designs. This skill makes your work more detailed without needing extra clay.
Try sketching your design first with a pointed tool. Then carve slowly so you can correct the lines before they go too deep.
Personal touches matter here, too. A carved name, symbol, or favorite pattern can make a piece feel like yours alone.
14. Build Larger Pieces in Sections

Top Build Larger Pieces In Sections Craft Tutorials
- 🧑🌾 We've all built some ridiculously big craft. Whats the … from reddit.com.
- 💅 DESIGNING AND BUILDING A CUPOLA FOR A YURT from mainecoastcraft.com.
- 🎨 Crafting Generic Building Chunks for Faster Construction from discourse.stonehearth.net.
- 🗺️ Cardboard scenery building techniques and templates from facebook.com.
- 🖼️ Large DIY Craft Room Cutting Table – Part 1 from addicted2decorating.com.
Larger sculptures can feel exciting because they make a strong visual statement. They also teach planning, patience, and a better sense of scale.
Work in sections so each part stays manageable. This method helps you avoid tired hands and gives you more control over the final shape.
Think about the base, middle, and top before you begin. A solid plan can lower waste and keep material costs under control, especially with bigger projects.
Many artists now like oversized clay forms with simple surfaces and quiet colors. You can make yours stand out by adding one bold texture or one bright glaze later.
15. Finish with Glaze Tests and Surface Choices

Top Finish With Glaze Tests And Surface Choices Craft Tutorials
- 💅 Glaze testing doesn't have to be overwhelming. In this 4- … from instagram.com.
- 🖼️ Let the glazing commence! I'm quickly heading towards … from facebook.com.
- 🧑🌾 An introduction to the principles of glazing with Rich Miller. from facebook.com.
- 🍂 Pottery Glazing Guide: Techniques for Beautiful Ceramics from lemon8-app.com.
Glaze changes the mood of a clay piece in a big way. Shiny, matte, speckled, or soft colors can make the same sculpture feel completely different.
Make small test pieces before finishing your main work. Testing saves money and helps you avoid surprises after firing.
Try warm earth tones for a natural feel or bright colors for a playful look. You can also keep one piece plain and let the clay body show for a more modern style.
Personalization shines at this stage, because color choice says a lot about your taste. A tiny test board with notes can help you build skill over time and make smarter choices on every future piece.