Clay can turn a quiet table into a tiny art studio. Fresh patterns make each piece feel alive and full of charm.
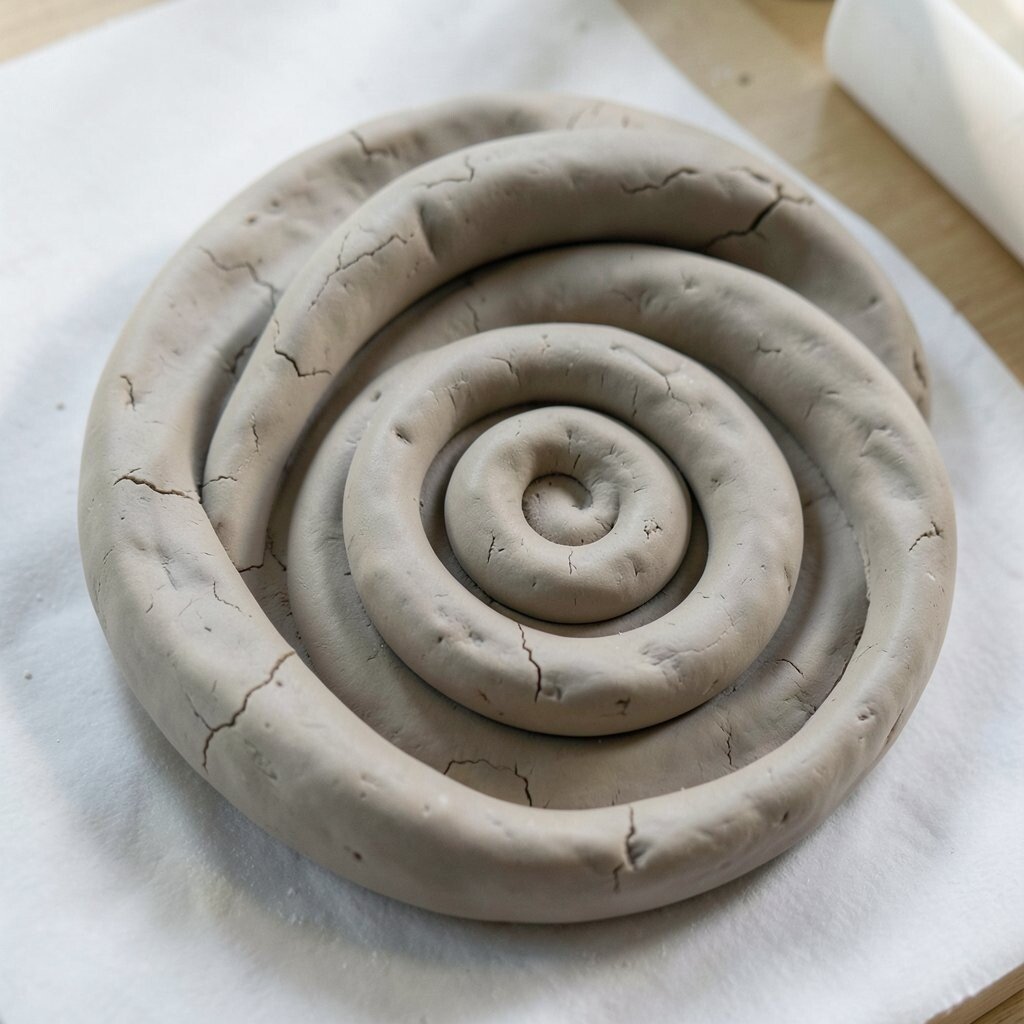
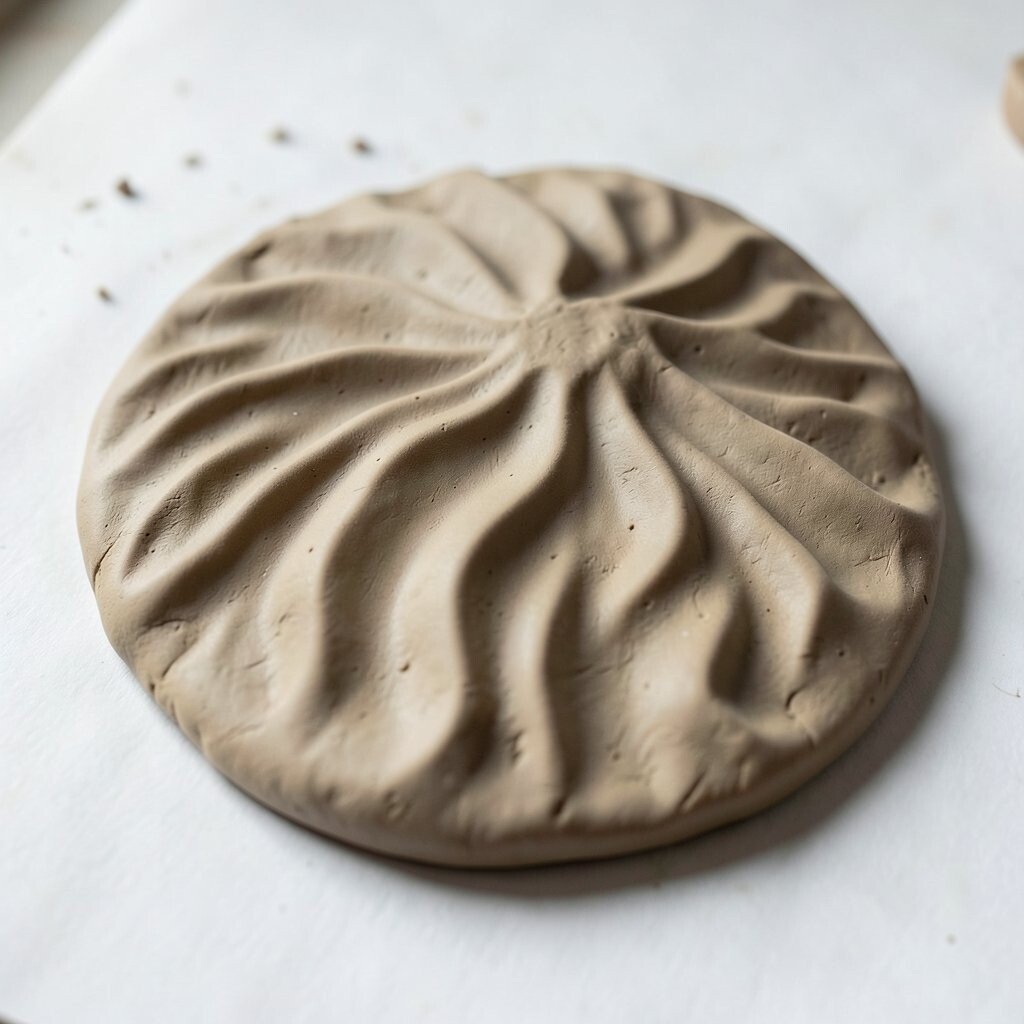
1. Spiral Shell Swirls
Top Spiral Shell Swirls Craft Tutorials
- 🍅 Little Wonders: Shapes in Nature from mnch.uoregon.edu.
- 🎄 Spiral Into Wondrous Whirls With These DIY Paper Crafts from blog.creativememories.com.
- 🎨 Seashell Snail Crafts 🛒 Materials Needed: from facebook.com.
- 🍅 The Spiral Shell Snail project is perfectly tactile, filled with … from instagram.com.
- 🍂 Seashells with Spiral Structures from projectmanaia.at.
Spiral shell swirls look soft, round, and a little dreamy, like a seashell or a rolled ribbon. They bring calm movement to bowls, pins, ornaments, and small figures.
Use a pointed tool or a toothpick to carve the swirls before the clay dries. This pattern is easy for beginners, low-cost, and great for personal touches like initials in the center of each curve.
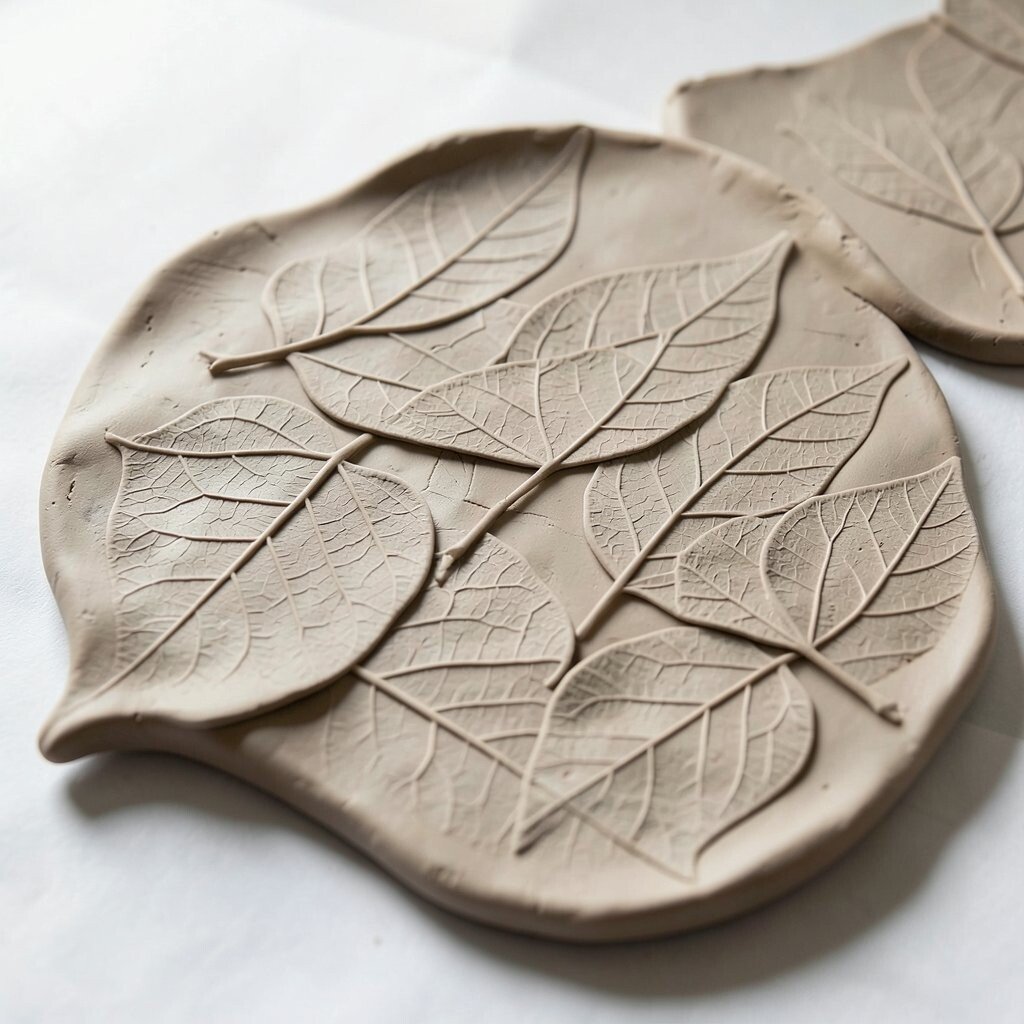
2. Leaf Vein Prints
Top Leaf Vein Prints Craft Tutorials
- 🍂 Leaf Printing: A Colorful Leaf Art Activity For Kids from foxfarmhome.com.
- 🎨 Leaf Prints Craft for Kids from abcmouse.com.
- 🗺️ 5 Minute Beautiful Leaf Prints Art (& 3 Secret Tips) from apieceofrainbow.com.
- 🗺️ 3 Ways To Make Prints With Leaves from hobbyfarms.com.
- 🍅 Leaf Prints for Kids from toddlerapproved.com.
Leaf vein prints add a fresh, natural look that feels bright and peaceful. The tiny lines make clay pieces look detailed without much effort.
Press real leaves into soft clay, then lift them away to leave the pattern behind. Try herbs, ferns, or houseplant leaves for different shapes, and use this idea on trays, charms, or wall art.
This style works well for spring themes, garden gifts, and earthy home decor. It is also a smart choice if you want a fancy look without buying many tools. A little paint wash after drying can make the veins stand out even more.
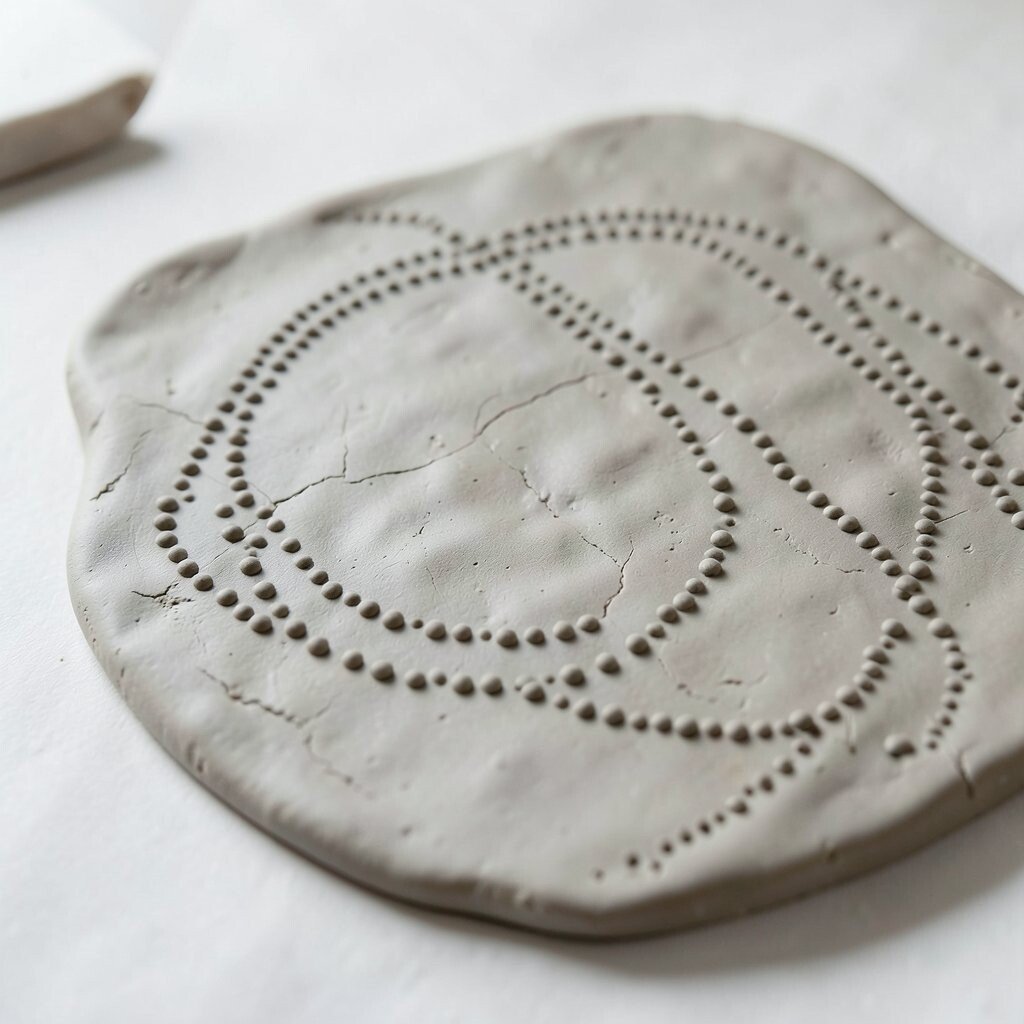
3. Tiny Dot Trails
Top Tiny Dot Trails Craft Tutorials
- 🧑🌾 If you want to make a trail of dots with a brush, it can take … from facebook.com.
- 👓 I think I figured out how to dot; Try, Try, Try, don't be afraid … from facebook.com.
- 🎄 where play meets purpose! Designed with care by Dot 2 Shape … from instagram.com.
- 👓 Create your very own Dot Marker Daisies Craft from mymommystyle.com.
Tiny dot trails give clay a happy, playful feel, almost like raindrops or candy sprinkles. They can make a plain surface feel lively in seconds.
Use the tip of a pencil, skewer, or straw end to press neat rows of dots. Mix dot sizes, place them in curves, or write a name with dots for a custom look.
Kids and beginners often love this pattern because it is simple and forgiving. It also uses almost no extra supplies, so it stays budget-friendly. Dot trails are trendy on mugs, trinket dishes, and modern jewelry pieces.
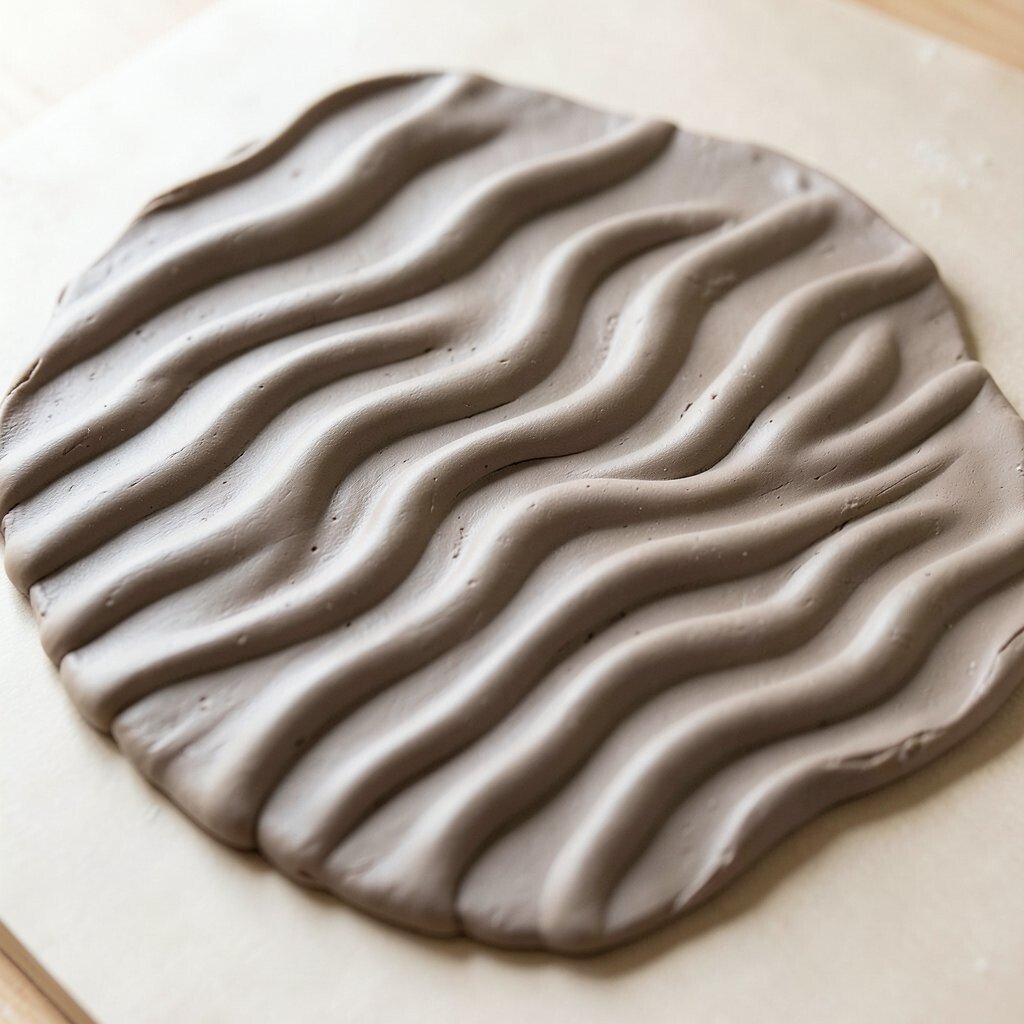
4. Wavy Water Lines
Top Wavy Water Lines Craft Tutorials
- 👓 Doodle sheet with wavy line? from facebook.com.
- 👓 How to Draw Water: Easy Step-by-Step Art Lesson for Kids from artprojectsforkids.org.
- 🖼️ This drawing indicates the wavy lines of ocean water. It … from instagram.com.
- 🎨 One of my classic go-to quilting motifs: organic wavy lines … from facebook.com.
Wavy water lines give clay a cool, flowing look that feels smooth and relaxed. The pattern can remind people of ponds, ocean ripples, or wind across a lake.
Draw the waves with a blunt tool and keep the lines soft and even. You can make them deep for strong shadows or shallow for a gentle effect, and both styles look lovely.
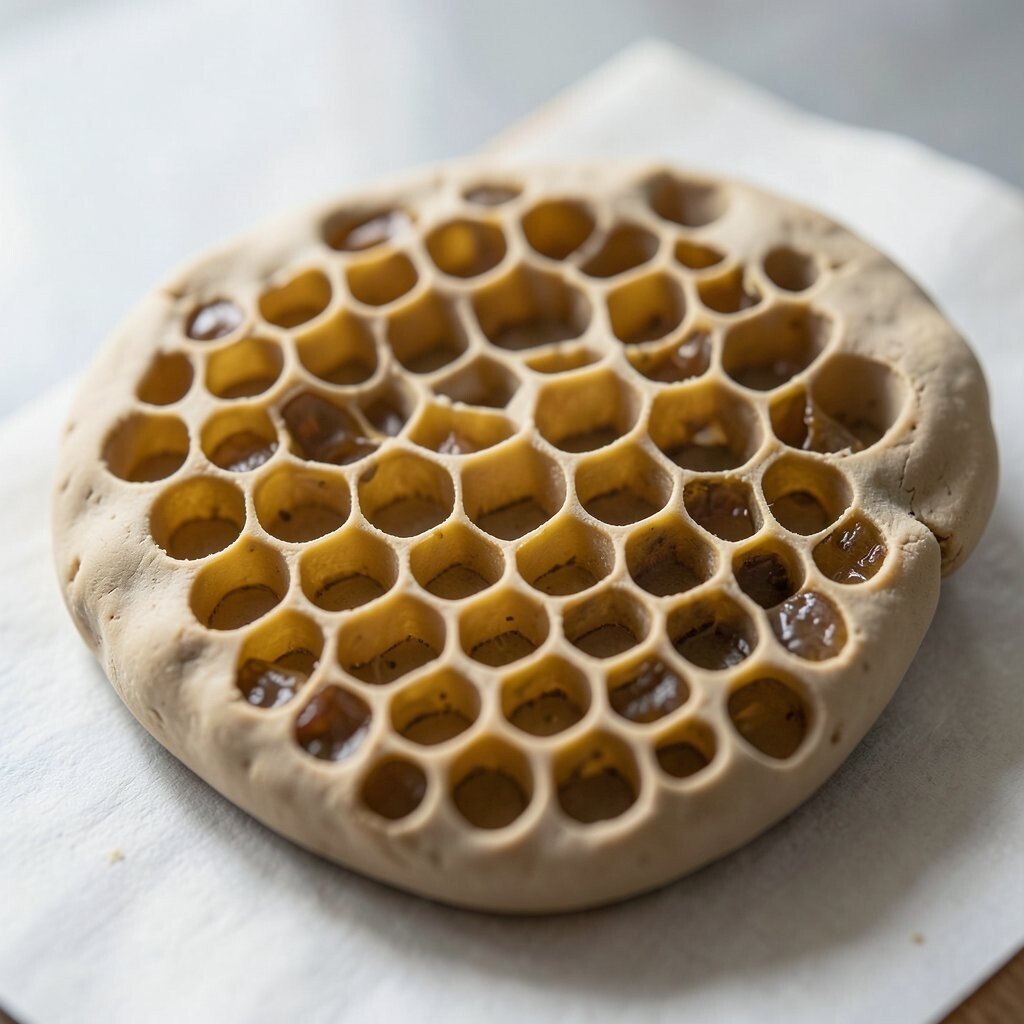
5. Honeycomb Cells
Top Honeycomb Cells Craft Tutorials
- 🧑🌾 Build a Honeycomb Structure, Free Classroom Learning … from purpleplow.org.
- 🍁 Honeycomb Craft | World Bee Day from twinkl.com.
- 🗺️ ? Cute, Simple Honeycomb craft for Kids from 123homeschool4me.com.
- 🍅 STEM & Maker Activity 34 from discoveryk12.com.
- 👓 Honeycomb method examples on complex shapes needed from facebook.com.
Honeycomb cells create a neat, patterned surface that feels tidy and modern. The repeated shapes add structure and make clay pieces look polished.
Press a hexagon stamp, small tube, or handmade template into the clay for a honeycomb effect. This pattern works well on coasters, plant pots, and decorative tiles, and it can be colored in many ways after firing or drying.
It is a great pick for makers who like clean lines and bold texture. The look is popular in home decor because it feels both natural and stylish. If you want a custom twist, leave a few cells open and fill them with tiny beads or paint.
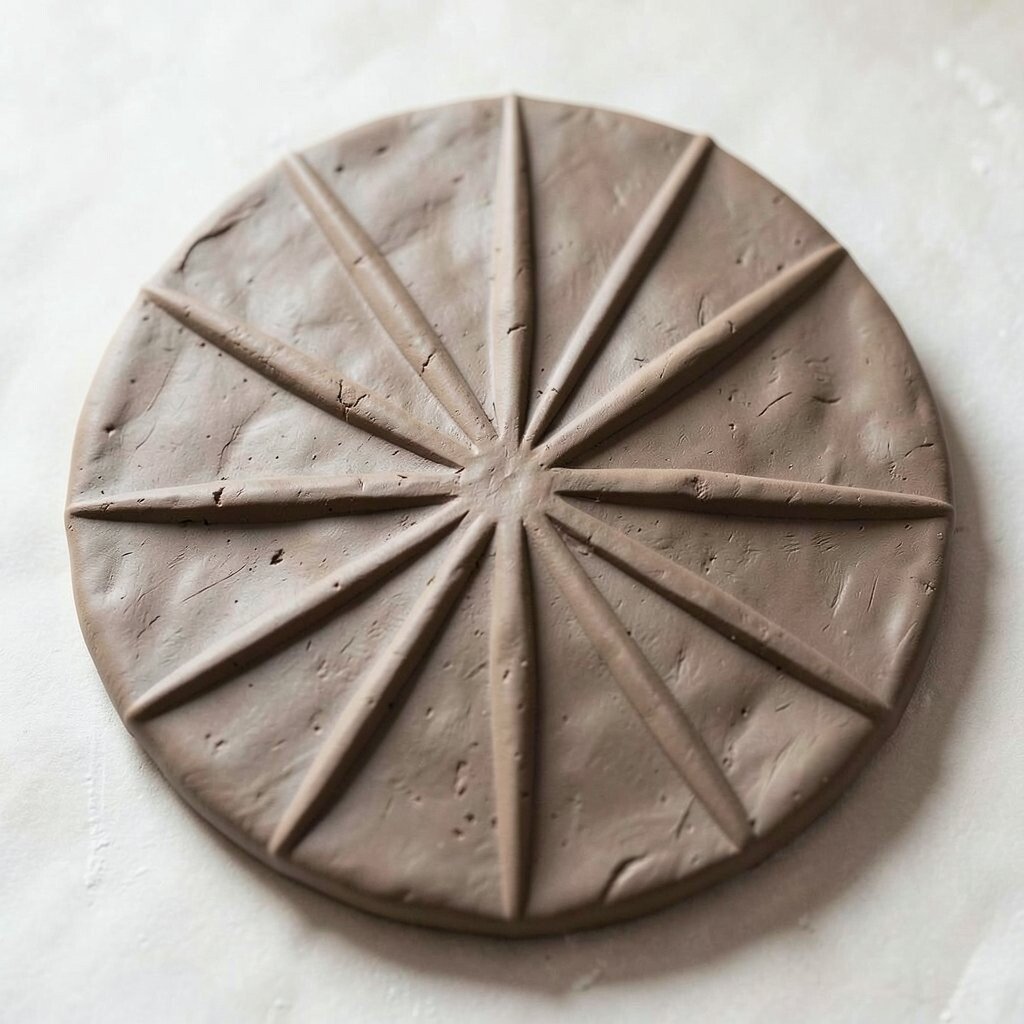
6. Starburst Rays
Top Starburst Rays Craft Tutorials
- 🗺️ Paper Starburst Decorations from domesticdaddy.net.
- 🎄 Stardust sun rays sketch idea tip from facebook.com.
- 🖼️ Sunburst Celestial Sun Rays Stencil 6" Art Paint Designs … from ebay.com.
- 👓 Six Ray Star royalty-free images from shutterstock.com.
- 🎄 Starburst (Sunburst) Technique: A Great Way To Use … from simplykardsbykathi.com.
Starburst rays make clay pieces feel bright and full of energy. They look like sunshine, fireworks, or a spark of joy.
Start at one center point and pull short lines outward with a needle tool. Change the line length for a more lively look, and try adding a small gem or bead in the middle for extra shine.
This pattern is perfect for party favors, holiday ornaments, and cheerful keychains. It can be made with very simple tools, so the cost stays low. A gold or silver finish can make the rays look extra special.
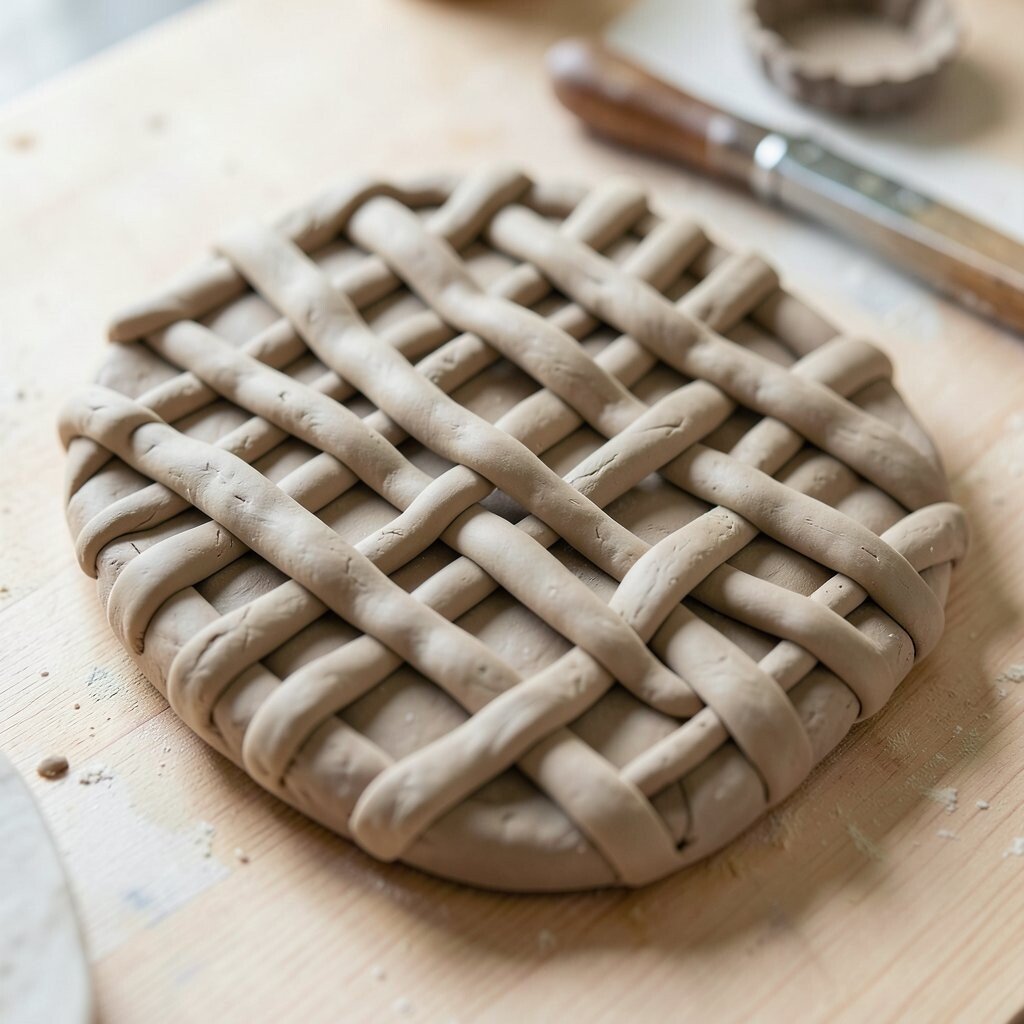
7. Crisscross Weave
Top Crisscross Weave Craft Tutorials
- 🎨 Easy Weaving Crafts for Kids: Hands-On Fun & Learning from imthecheftoo.com.
- 🎨 Weave the Criss Cross potholder design with my new … from instagram.com.
- 🍂 Weave the Criss Cross Design Potholder from goodknitkisses.com.
- 🎄 Mid weave criss cross wire weaving with ring from facebook.com.
- 💅 Nature Weaving with Found Object Art from littlebinsforlittlehands.com.
Crisscross weave patterns make clay look like fabric, baskets, or braided strips. The texture feels warm and handmade, which gives each piece a cozy style.
Use thin clay ropes or a carving tool to make the over-and-under lines. Keep the spacing even for a neat look, or make it loose for a more rustic feel.
This pattern is nice for candle holders, vases, and frame borders. It adds strong visual interest without needing much paint. If you want a personal touch, weave in a heart shape or a small name tag area.
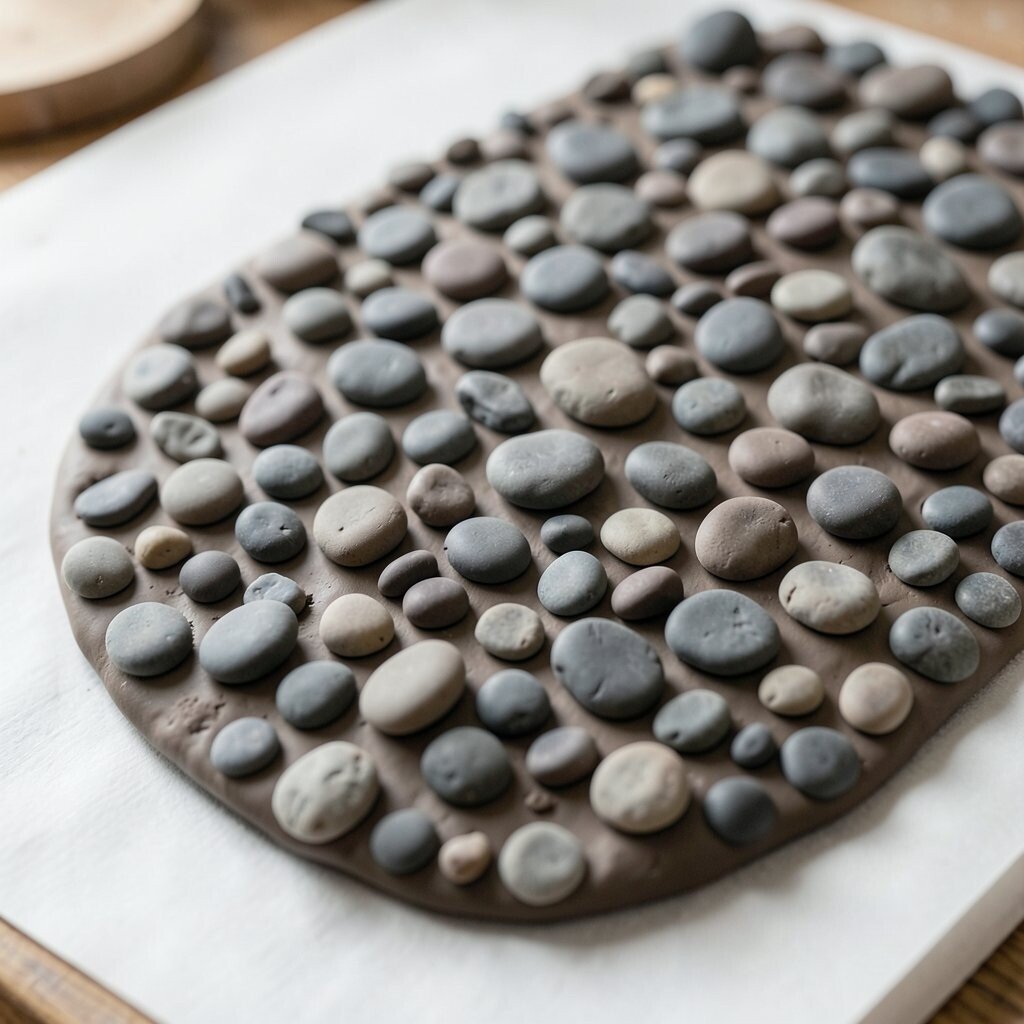
8. Pebble Bumps
Top Pebble Bumps Craft Tutorials
- 👓 DIY Pebble Art Tutorial from howweelearn.com.
- 🍁 Pebble art materials and techniques from facebook.com.
- 🧑🌾 Dad joke alert: This DIY craft totally rocks! Turn playground … from facebook.com.
- 🎨 Scrap Fabric Pebbles Tutorial from sewingbeefabrics.co.uk.
- 🖼️ Love this pebbles canvas art!! 🖼️ https://www.craftionary. … from facebook.com.
Pebble bumps bring a soft, bumpy texture that feels friendly and fun to touch. The rounded surface can make clay items look like stones from a stream bed.
Press the end of a spoon, bead, or rounded tool into the clay to make gentle bumps. Keep the bumps close together for a full texture, or space them out for a lighter look.
This style is good for sensory play because it gives hands something interesting to feel. It is also easy on the wallet since common home items can make the pattern. Pebble bumps work well on garden markers, knobs, and simple sculpture bases.
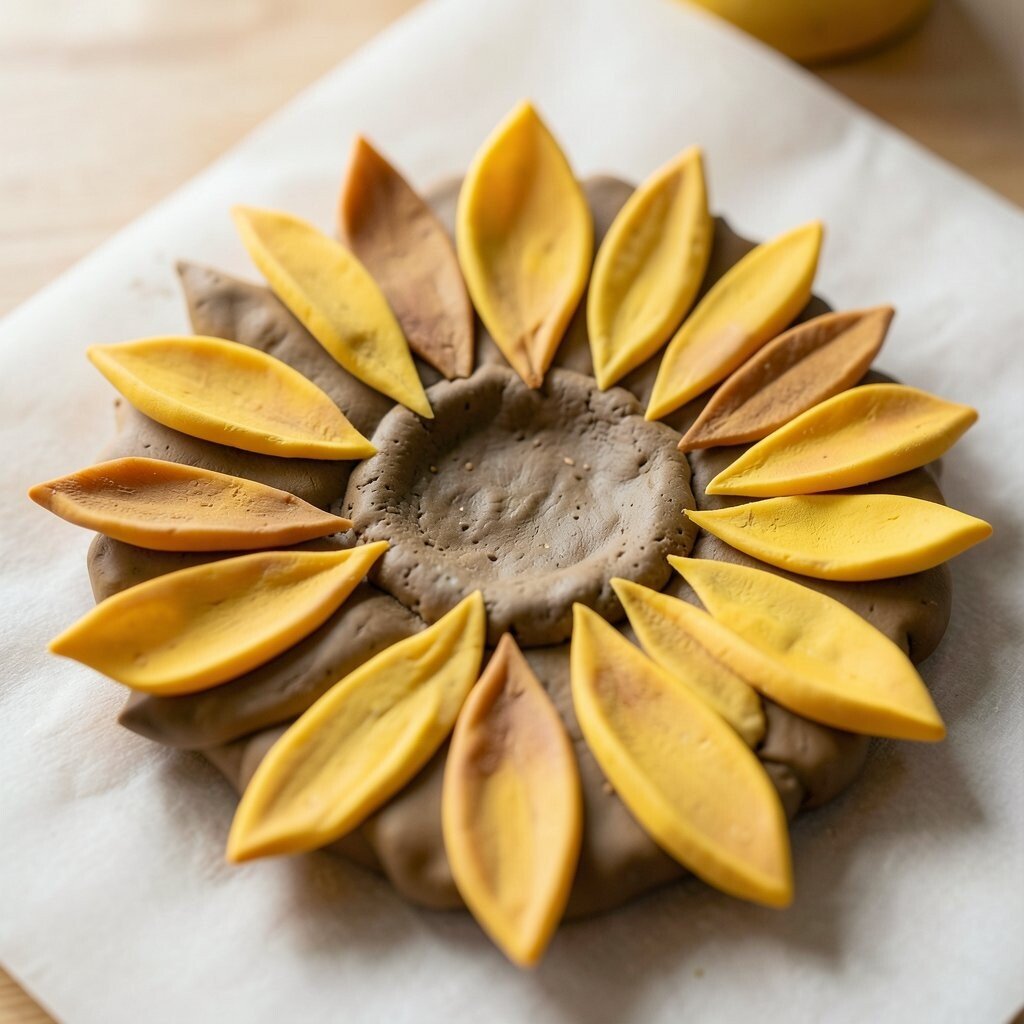
9. Sunflower Petal Cuts
Top Sunflower Petal Cuts Craft Tutorials
- 🎄 Sunflower Petal Template from eset.desales.edu.
- 🗺️ Sunflowers are easy if you cut a sponge into petal shapes. … from facebook.com.
- 🖼️ Paper Roll Sunflower Craft from artycraftykids.com.
- 🍂 Giant Paper Sunflower Tutorial – This Will Mesmerize You! from jennifermaker.com.
Sunflower petal cuts look bright, bold, and cheerful, like a field flower on a sunny day. The carved petals give clay a happy, nature-inspired feel.
Cut small teardrop shapes around a center circle, then press each petal edge for depth. Add tiny dot centers, soft paint, or a glaze finish to make the flower stand out.
This pattern is a favorite for seasonal decor and handmade gifts. It feels unique because each petal can be shaped a little differently. For a custom version, try long petals for a wildflower look or short petals for a neat garden style.
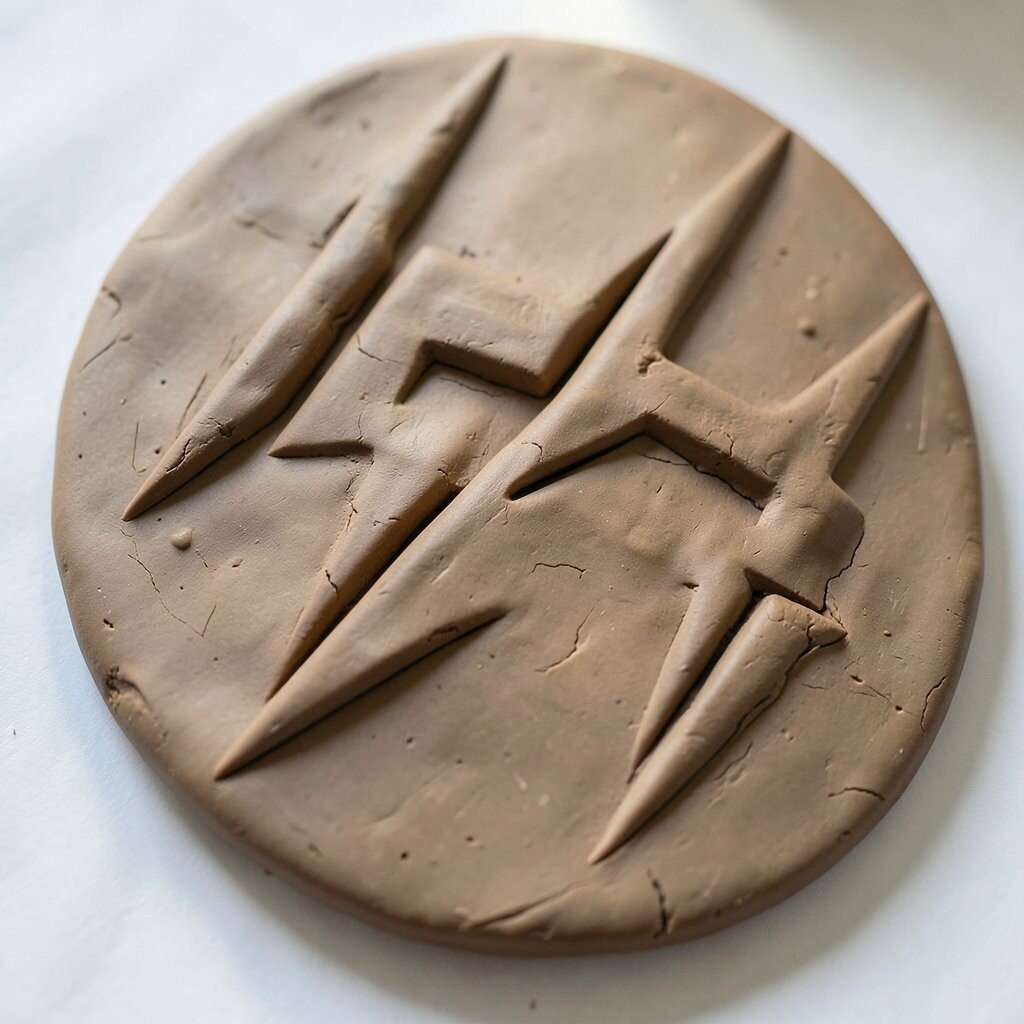
10. Zigzag Lightning
Top Zigzag Lightning Craft Tutorials
- 💅 Craft Lightning: The Ultimate Zipper Pouch from myveryeducatedmother.com.
- 🍂 Variation in color of the lightning bolt pattern from facebook.com.
- 💅 Lightning Bolt Patterns royalty-free images from shutterstock.com.
- 🍅 the stripe, the dot, and the ring. We're so fond of it … from facebook.com.
- 🖼️ EROTNGO Zig Zag Lightning Bolt Shape Polymer Clay Cutter … from amazon.in.
Zigzag lightning gives clay a bold, fast-moving look that feels full of action. It can make a simple piece seem edgy and modern.
Carve sharp angles across the surface with a slim tool or craft knife. Use one big bolt for a strong center or many small bolts for a busy pattern that feels energetic.
This design is popular for teen rooms, game-themed decor, and cool accessory pieces. It is simple to make, so the supply cost stays low. Try painting the grooves with bright colors for a fun pop.
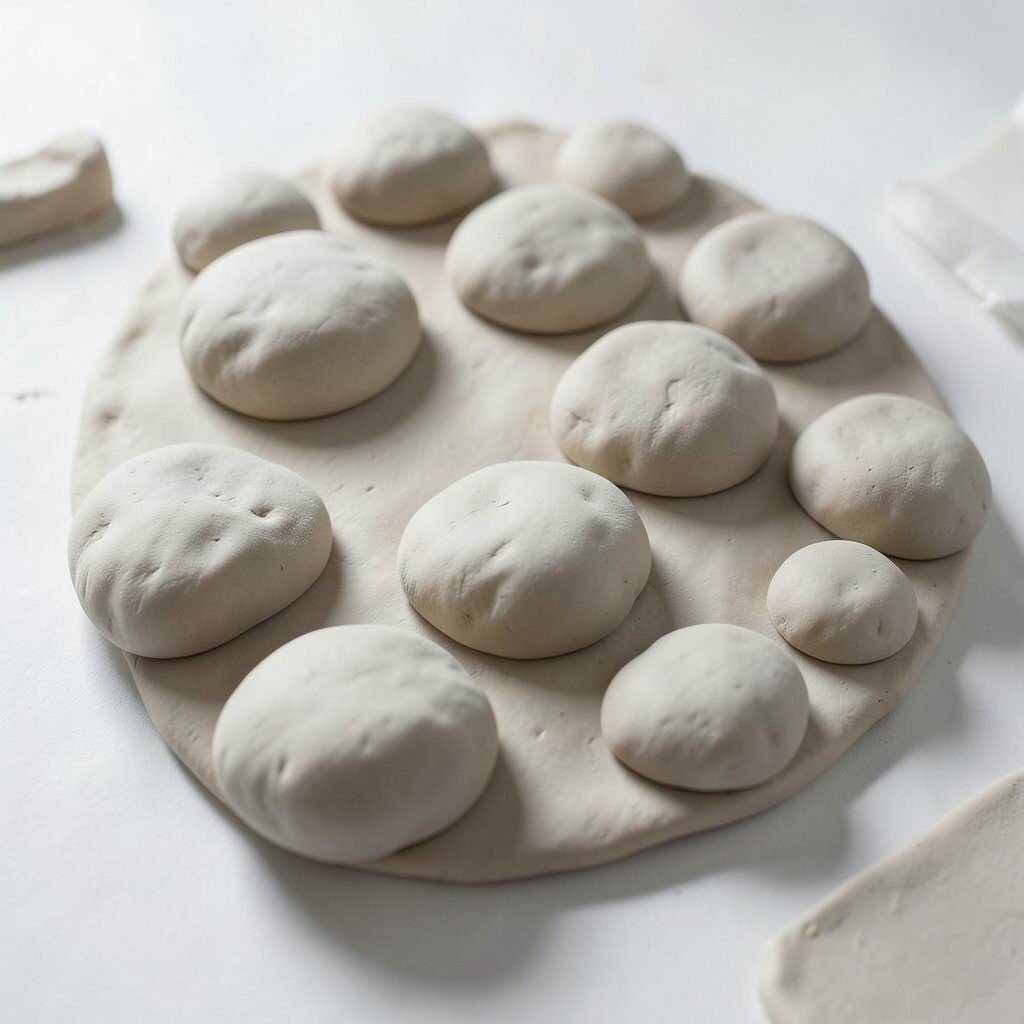
11. Cloud Puff Shapes
Top Cloud Puff Shapes Craft Tutorials
- 🎄 12 Free Printable Cloud Templates | Download Now! from justfamilyfun.com.
- 🍁 How to make crochet cloud puffs? from facebook.com.
- 🍅 Cloud Painting from sciencebuff.org.
- 🍂 Puffy Paint Crafts for Kids: Textured Fun & Learning from imthecheftoo.com.
- 🧑🌾 Puffy Paint Clouds from notimeforflashcards.com.
Cloud puff shapes make clay look soft, sweet, and dreamy. The rounded edges create a gentle style that feels calm and happy.
Form the clouds with small curved cuts or by pressing and shaping the clay with your fingers. Add tiny face details, stars, or raindrops if you want a playful scene.
This pattern works well for nursery decor, name plaques, and charm sets. It is a nice choice for makers who want a cute look without much fuss. Soft pastel paint can make the cloud theme feel even more modern.
12. Crosshatched Mesh
Top Crosshatched Mesh Craft Tutorials
- 🍅 Crosshatch Fabric from walmart.com.
- 🎄 Can anyone tell me what this craft is called? It's yarn that … from reddit.com.
- 🍂 13 Count Stitch Cloth 12×39 Inch White Plain Weave Basic … from walmart.com.
- 🎄 cross stitch fabric from shop.tiktok.com.
- 🍁 Ribbon #29 New Vintage MSI Crosshatch Beige Floral Craft 1 … from ebay.com.
Crosshatched mesh gives clay a smart, textured look that feels crisp and tidy. The crossing lines create shade and depth, even before any paint is added.
Scratch one set of lines in one direction, then add another set across them. Keep the lines light for a delicate effect, or press harder for a stronger pattern that stands out.
It is a useful style for bowls, tiles, and small art panels. The pattern is low-cost because it only needs a simple tool and a steady hand. If you want a personal twist, shape the mesh into hearts, diamonds, or curved corners.
13. Raindrop Tears
Top Raindrop Tears Craft Tutorials
- 👓 Day It Rained Hearts Craft Idea – use torn paper for the … from facebook.com.
- 🖼️ Make Easy Raindrop Art from an Old Magazine from uglyducklinghouse.com.
- 🍅 Making raindrops from scrapbook.com.
- 💅 Free Crochet Pattern…Little Raindrops from fiberfluxblog.com.
- 🧑🌾 Umbrellas and Raindrops from teacherspayteachers.com.
Raindrop tears look delicate and fresh, like water sliding down glass. The shape adds a soft shine and a little motion to clay surfaces.
Make each drop by pressing a teardrop shape into the clay with a rounded tool. Place them in rows, scatter them lightly, or cluster them near the top for a falling-water feel.
This pattern is lovely for spring crafts and calm, spa-like decor. It feels unique because the shapes can be tiny and neat or large and bold. Add blue, pearl, or clear finishes to make the drops look glossy and bright.
14. Fence Post Slats
Top Fence Post Slats Craft Tutorials
- 🍂 Farmhouse collection on 14" x 14" wood slat fence from facebook.com.
- 💅 DIY Slat Wood Privacy Fence from abeautifulmess.com.
- 🍁 Clever DIY Projects To Reuse Old Fence Posts https … from facebook.com.
- 🍁 DIY How to Create a Slat Fence with Pallet Wood from kezzabeth.co.uk.
Fence post slats give clay a charming country look that feels simple and homey. The straight lines can make a piece feel sturdy and neat.
Press a flat tool to create evenly spaced slats, then add small nail-like dots if you want a rustic touch. This design works well for signs, garden labels, and little house decorations.
It is a good pattern for makers who like farmhouse style or cozy porch decor. The tools can be basic, so the price stays friendly for beginners. Personalize it with a family name, a pet name, or a tiny flower border.
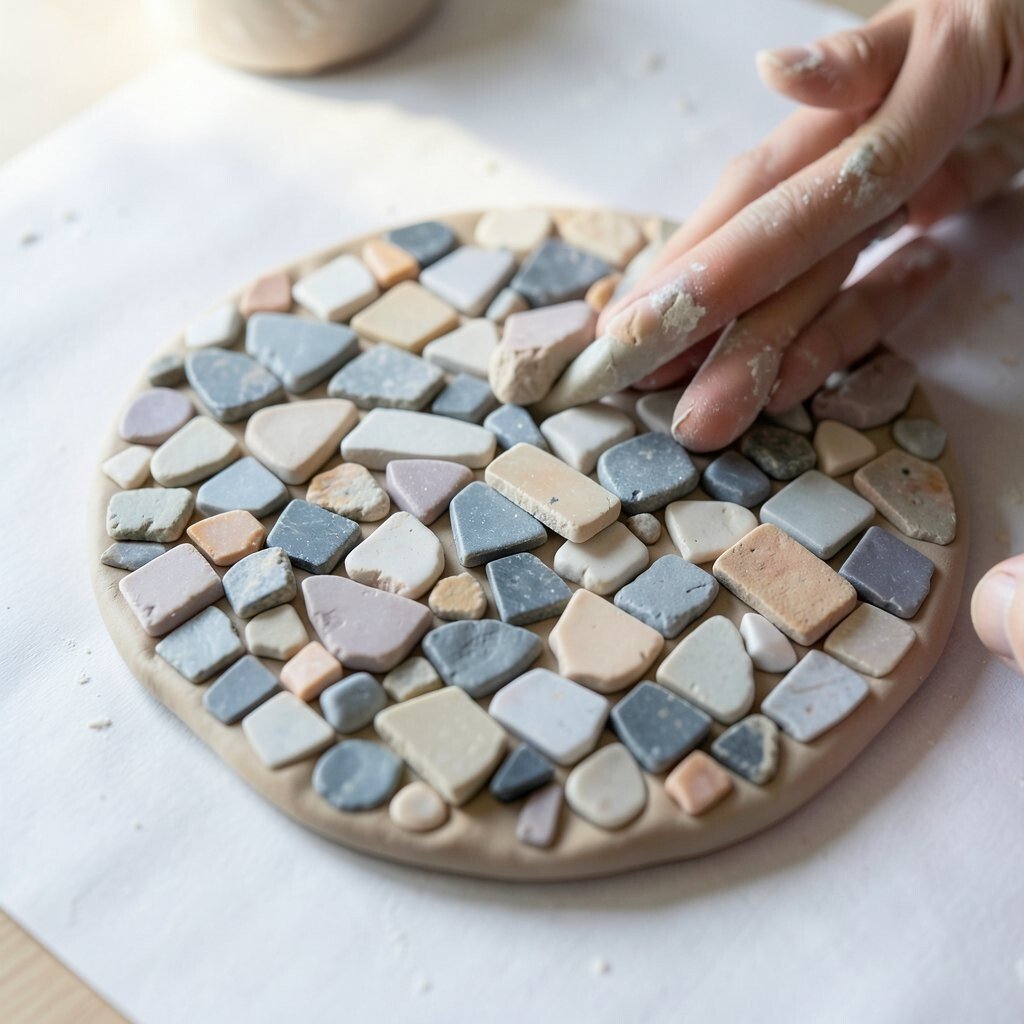
15. Mosaic Tile Bits
Top Mosaic Tile Bits Craft Tutorials
- 🧑🌾 Mosaic Tile Tweezers 15cm Great for those fiddly bits from ebay.com.
- 👓 Mosaic Tile Assortments from mosaicartsupply.com.
- 🍂 WitsEnd Mosaic | Mosaic Art Supplies | Mosaic Tile & Tools from witsendmosaic.com.
- 🍅 Tools & Supplies from delphiglass.com.
- 👓 Recycle Ceramics Into Awesome Mosaic Stepping Stones from instructables.com.
Mosaic tile bits make clay look colorful and lively, like a tiny wall made from broken glass or stone. The mixed shapes create strong visual texture and a handmade art feel.
Press small clay pieces, bead shapes, or cut tile-like sections into the base before it dries. Use bright colors for a bold look or soft shades for a calm, modern style.
This pattern is popular in current craft trends because it feels creative and artsy. It can take more time than simple textures, but the result looks rich and special. If you want to keep costs down, use scrap clay pieces from older projects.
16. Finger Ridge Waves
Top Finger Ridge Waves Craft Tutorials
- 🧑🌾 Master the Crochet Ridge Stitch: Add Beautiful Texture to … from facebook.com.
- 💅 Precision. Patience. Pattern. Finger waves aren't just a … from instagram.com.
- 👓 Finger waves are NOT curls… they're sculpture. ✨🌊 With # … from instagram.com.
- 🍂 Ocean Wave Finger Waves from tiktok.com.
- 🧑🌾 My Secret to Flawless Finger Waves on Natural Pixie Cuts! ✨ from lemon8-app.com.
Finger ridge waves show the maker’s touch in a warm and personal way. The soft ridges look human, natural, and full of character.
Run your fingertips or knuckles lightly across the clay to leave smooth wave marks. Each line will be a little different, which makes the piece feel one of a kind.
This pattern is wonderful for handmade gifts because it feels personal and sincere. It costs almost nothing and can be done with no special tools at all. Try pairing it with matte paint or earthy colors for a calm, modern finish.