Clay can turn a quiet afternoon into a tiny art studio. Hands get busy, imaginations wake up, and simple shapes start to feel special.
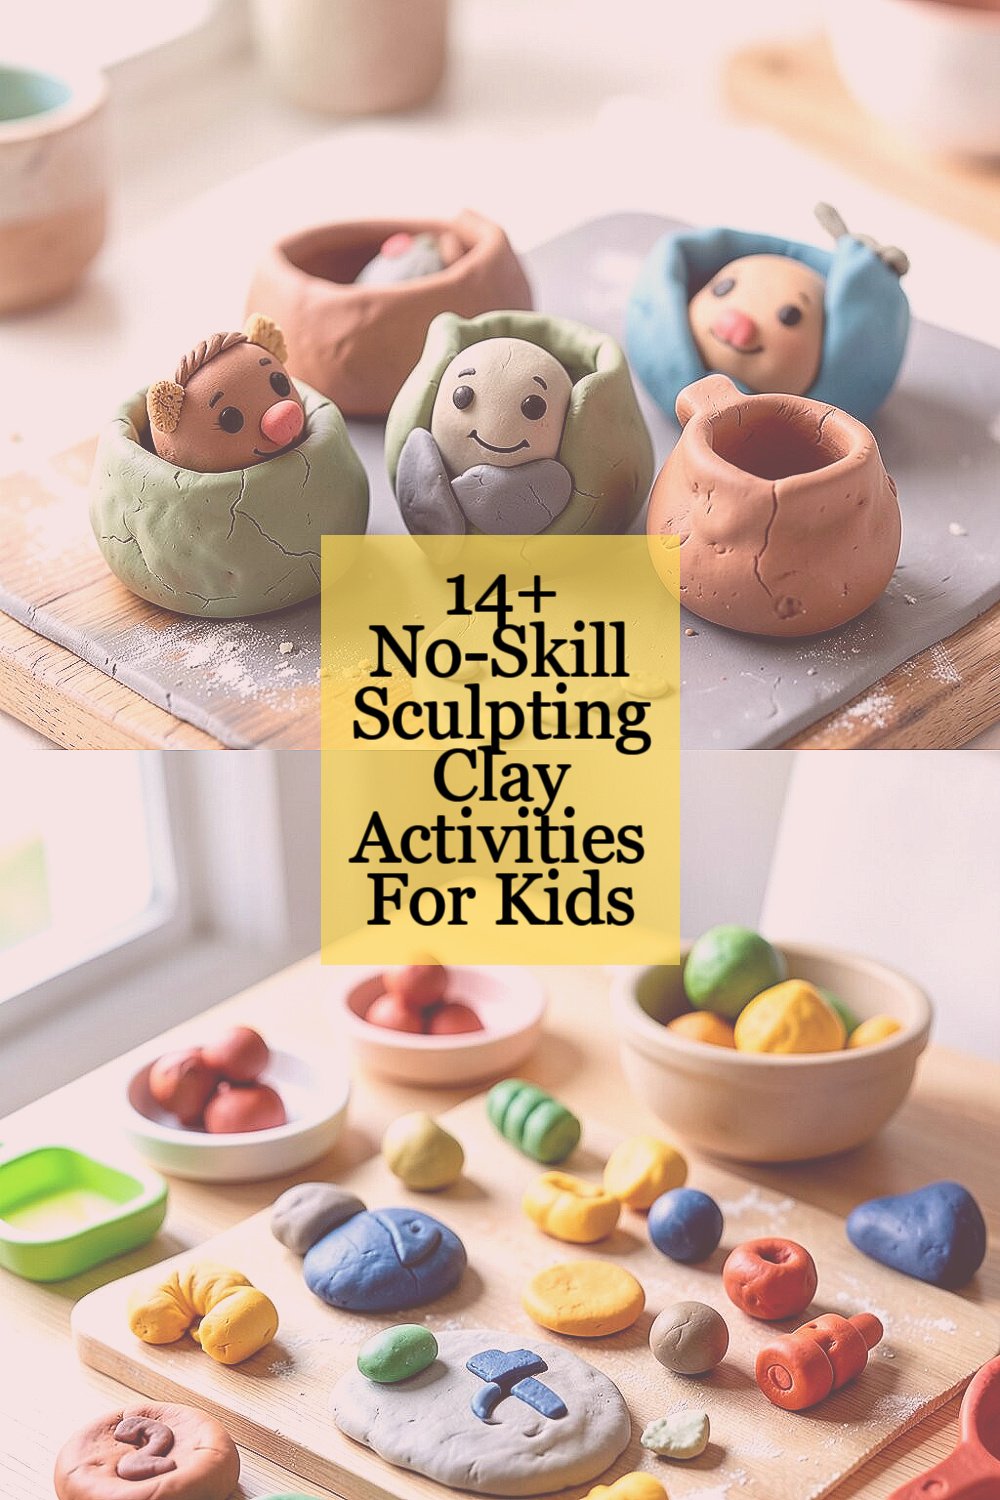
1. Pinch Pot Creatures

Top Pinch Pot Creatures Craft Tutorials
- 🗺️ Pinch Pot Animals for Kinder and First Grade from deepspacesparkle.com.
- 👓 How To Build Clay Pinch Pot Animals from craftyartideas.com.
- 🍁 Pinch Pot Monsters – Clay Making for Kids from schooltimesnippets.com.
- 👓 How to Make Nature Pinch Pots with Kids from littlepinelearners.com.
- 🧑🌾 Pinch Pot Monsters from deepspacesparkle.com.
Pinch pots are a friendly first step because kids only need a small ball of clay and their fingers. The soft, round shape can become a little owl, a smiling monster, or a tiny bowl with eyes.
This activity builds hand strength and helps kids learn how pressure changes shape. Add buttons, beads, or sticks for details, and let each child pick a favorite color after the clay dries.
2. Clay Food Play

Top Clay Food Play Craft Tutorials
- 🎨 Mini Food Tutorial: Miniature Sugar Cookies from lifeinmini.com.
- 🍁 Moon Sand Recipe | How to Make … from onelittleproject.com.
- 🗺️ Make Miniature Pies with Kids: Bottle Caps & Polymer Clay … from adventure-in-a-box.com.
- 🎄 Crazy fun cereal clay made with kitchen ingredients … from facebook.com.
- 🎄 Good clay for making play food for kids? from reddit.com.
Clay food looks bright and fun on a pretend table, from cherries to cupcakes to tiny pizza slices. Kids love making pretend snacks that match what they eat at home or what they see in favorite games.
This is a great way to talk about colors, shapes, and healthy foods while hands stay active. Use a little flour on the table to keep clay from sticking, and choose air-dry clay if you want keepsakes without a kiln.
Personal touches make the play even better, like adding “sprinkles” made from small dots or carving tiny fork marks into a cookie. Many families like this trend because it mixes pretend play with art, and the supplies can stay low-cost if you use scraps and simple tools.
3. Thumbprint Garden Tags

Top Thumbprint Garden Tags Craft Tutorials
- 💅 Garden Craft: Plant Markers Free Pattern Download from woojr.com.
- 🖼️ Fingerprint garden markers for kids to help from facebook.com.
- 💅 Creative Fingerprint Garden Labels from twitchetts.com.
- 🖼️ Easy and Fun DIY Garden Markers from mygardenlife.com.
- 🧑🌾 Fingerprint Art: Flower Pot Kids Craft – Jessica Etcetera from jessicaetcetera.com.
Kids can press thumbprints into flat clay pieces to make flowers, leaves, bugs, or seed markers. The result looks sweet and handmade, like a little garden sign from a storybook.
These tags are useful and pretty, so children get a craft that can also help in the yard or on a windowsill. Try writing plant names with a toothpick, and use twine or popsicle sticks to make them easy to place in pots.
Children can choose their own colors and shapes, which makes every tag feel personal. This project stays budget-friendly because one package of clay can make many tags, and the finished pieces can be painted in bright, trendy garden colors.
For extra charm, press in tiny dots for ladybugs or wavy lines for vines. The activity gives kids a calm, focused task and a chance to feel proud when their art helps a plant space look neat.
4. Clay Name Tiles

Top Clay Name Tiles Craft Tutorials
- 🍂 How to Make Polymer Clay Letter Tiles and Embellishments from scraperfect.com.
- 👓 33 DIY Clay Tile Art Ideas People Don't Expect to Love This … from wonderfuldiy.com.
- 🗺️ Ceramic Name Plate Clay Tile Art Lesson Name Project … from teacherspayteachers.com.
- 🗺️ Make Polymer Clay Letter Tiles to Use for Craft or Play from kindredandwillow.com.
- 💅 Graffiti Fence Name Designs from amslerartroom.com.
Clay name tiles are simple squares or circles with a child’s name pressed or carved into the surface. They look clean and bold, and kids enjoy seeing their own name turned into art.
This activity supports letter learning and gives practice with spelling in a fun way. Add stars, hearts, or sports shapes around the name, and let kids pick a color theme that matches their room or backpack.
5. Texture Treasure Plates

Top Texture Treasure Plates Craft Tutorials
- 🎄 Treasure Craft Japan SOUTHWEST Dinner Plates 10 5/8" … from ebay.com.
- 🗺️ What Will Be In Your Treasure Chest Craft 🦀 https://www. … from facebook.com.
- 🗺️ Fun & Educational Plate Crafts for Kids of All Ages from imthecheftoo.com.
- 🎄 12" Treasure Craft 1986 CHD Made in the USA Serving Plate from ebay.com.
- 🎄 Tea-Stained Treasure Maps | DIY for Beginners from kiwico.com.
Texture plates invite kids to press lace, bark, coins, shells, or toy parts into soft clay. The surface turns into a bumpy, patterned treasure that looks different every time.
This kind of play teaches touch awareness and helps kids notice tiny details in everyday objects. Keep a small tray of safe texture items nearby, and remind children to press gently so the shapes show clearly.
Because the results are always unique, no two plates ever look the same. Families often like this idea because it uses cheap found objects, and it fits the current love for sensory art and hands-on learning.
Kids can paint the dried plates later or leave them plain for a natural look. Either way, the finished piece feels special because it carries the marks of the child’s own hands and choices.
6. Clay Bug World

Top Clay Bug World Craft Tutorials
- 🎄 Have you created your clay bug yet? It's the perfect activity … from facebook.com.
- 🧑🌾 Buzz Into Action with the Build-A-Bug Activity from natureintoaction.com.
- 🗺️ Insects craft ideas | Craft guides & templates from bakerross.co.uk.
- 🎄 Buzzing with Creativity: Engaging Bug Crafts for Kids from imthecheftoo.com.
- 🎨 Insect Clay Craft Course Overview | PDF from scribd.com.
A clay bug world can be as tiny or as wild as a child wants, with ants, beetles, worms, and fuzzy caterpillars. The little creatures can sit on a flat clay hill or hide in a pretend garden made from leaves and sticks.
This activity sparks storytelling and helps kids think about nature in a gentle way. Use a craft stick to make legs, antennae, or little trails, and keep the shapes simple so the project stays easy.
Kids can make a favorite insect from a book or create a silly bug with rainbow spots and giant eyes. Since clay can be reused before it dries, the cost stays low while the fun stays high.
7. Coil Snake Art

Top Coil Snake Art Craft Tutorials
- 🗺️ Coiled Snake Craft | Crafts for Kids from pbs.org.
- 🍁 Cardboard tube coiled snakes craft project from facebook.com.
- 👓 How to Make Paper Plate Snake Craft from mombrite.com.
- 👓 Cardboard Tube Coiled Snakes from craftsbyamanda.com.
- 💅 Coil into Creativity: Chinese New Year Snake Crafts for Kids from imthecheftoo.com.
Coil snakes are long, twisty, and easy to make by rolling clay into ropes. Once the rope is bent into a curl, it starts to look like a snake ready to slither across the table.
This project helps kids practice rolling and shaping with both hands. Add a tongue, eyes, or stripes, and let children name their snake after a pet, a movie character, or something from their imagination.
Some kids like to make friendly snakes with smiles, while others enjoy making wild jungle snakes with spots. The trend of animal art is popular right now, and this one is simple enough for beginners but still full of personality.
For a neat finish, place the snake on wax paper so it keeps its shape while drying. A little extra clay can become a rock, a leaf, or a tiny nest to make the scene feel complete.
8. Clay Face Masks

Top Clay Face Masks Craft Tutorials
- 🖼️ 7 Unique Ways to Make a Clay Facial Mask from livesimply.me.
- 🍅 Clay Face Masks from amaco.com.
- 🎄 Rose Clay Facial Mask Recipe from naturesgardencrafts.com.
- 🎨 Easy Paper Mache Mask – Instructables from instructables.com.
- 🍅 DIY Face Mask {11 Homemade Recipes You'll Love!} from homemadeforelle.com.
Small clay face masks can start as flat ovals and then grow eyebrows, noses, cheeks, and funny mouths. They look dramatic and playful, almost like tiny theater props.
This activity encourages emotional expression because kids can make happy, sleepy, surprised, or grumpy faces. Keep the features large and simple, and use a straw to poke holes if the mask needs hanging later.
Children can make a self-portrait mask or invent a character with wild hair and big ears. Since the project uses only a little clay, it is a smart choice for families watching supplies and costs.
Paint can add even more life after the clay dries, especially with bold colors that fit current kid-art trends. The best part is that each mask becomes a one-of-a-kind face that can start a lot of stories.
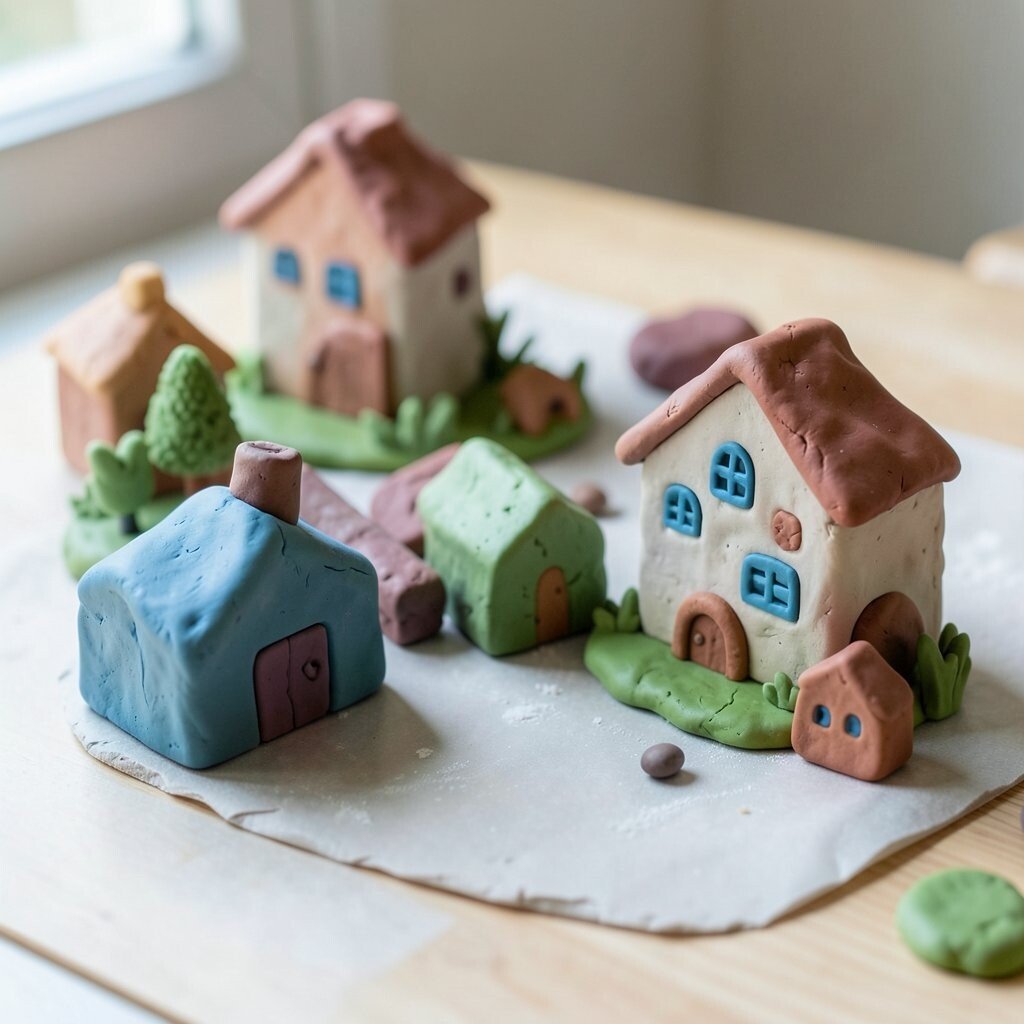
9. Mini Clay Houses
Top Mini Clay Houses Craft Tutorials
- 🗺️ How to Make a House out of Air Dry Clay from colorfulcraftcorner.com.
- 🖼️ make a simple fairy tale house with clay for a fun kids' craft … from facebook.com.
- 👓 Start small with these 12 mini clay crafts house ideas for … from instagram.com.
Mini clay houses are charming little buildings with square walls, triangle roofs, and tiny doors. They can look like cozy cottages, tree houses, or even candy-colored castles.
Kids learn about basic shapes while building something that feels like a real place. Add windows with a pencil tip, press in brick lines, and let each child choose a theme such as farm, fairy, or city.
These houses can sit on a shelf, become part of a play scene, or join a classroom village. Air-dry clay works well here, and families can keep costs down by using cardboard scraps for roofs or bases.
Some children may want a plain house, while others may cover theirs with dots, swirls, and tiny flower boxes. That freedom makes the project feel personal and helps every child feel successful, even with very little experience.
10. Clay Story Stones

Top Clay Story Stones Craft Tutorials
- 🗺️ 10 Creative Clay Craft Ideas for Kids | Blog from brushcrazy.com.
- 🗺️ How To Make Story Stones with Uni-ball Posca Pens from thepurplepumpkinblog.co.uk.
- 💅 How to make your own story stones and print out designs from facebook.com.
- 🎄 Cinderella Story Stones craft activity guide from bakerross.co.uk.
- 🍂 Camping Story Stones for Kids from viewsfromastepstool.com.
Clay story stones are smooth little shapes with simple pictures pressed into them. A sun, a fish, a tree, or a crown can each become a clue for a made-up tale.
This activity supports speaking skills and helps kids build stories one piece at a time. Make several stones, toss them in a bag, and let a child pick a few to start a scene.
The stones are easy to personalize with favorite animals, family symbols, or holiday shapes. They are also a smart low-cost craft because a small amount of clay can create many pieces for play and reading time.
Today, many parents and teachers love story stones because they mix art with early literacy. If you want a polished look, rub a little paint into the carved lines after drying so the pictures stand out better.
11. Clay Shell Prints

Top Clay Shell Prints Craft Tutorials
- 🖼️ Make clay seashell art with your beach treasures! 🐚 so … from facebook.com.
- 🎄 Colorful Shell Sculptures for Kids from fun-a-day.com.
- 🎨 Sand Clay Handprint Keepsake with Seashells from thecraftathomefamily.com.
- 🖼️ 15 Seashell Crafts: Easy Summery Craft Ideas for Kids from mommypoppins.com.
- 🍂 Your Beach Vacation Just Got Crafty: Make Beautiful Clay … from creators.yahoo.com.
Clay shell prints bring beach style to the craft table, even on a rainy day. Kids press shells into soft clay and get lovely ridges, swirls, and wave-like marks.
This is a calm, sensory activity that helps children notice patterns in nature. Try making pendant shapes, ornaments, or small wall tiles, and choose ocean colors for a fresh look.
Families can collect shells from a trip or use craft shells from a store, which keeps the project flexible. The trend of nature-inspired art makes this idea feel current, and the finished pieces can look fancy without costing much.
Children may want to add fish, starfish, or tiny pearl dots around the prints. A ribbon loop or magnet on the back can turn the craft into a gift or a room decoration.
12. Clay Bead Chains

Top Clay Bead Chains Craft Tutorials
- 🗺️ Clay Bead Necklace Ideas – 3 Ways from momsandcrafters.com.
- 👓 DIY Clay Bead Necklace from artsyfartsymama.com.
- 🍁 12 Strands Bead Chains 6 mm Polymer Clay … from amazon.ie.
- 🧑🌾 DIY Clay Bead Necklace from melyssagriffin.com.
- 🎨 DIY Clay Bead Necklace from thecraftedlife.com.
Clay bead chains are cheerful strands made from rolled clay balls or tubes. The beads can be round, oval, striped, or squished into silly shapes that look bright and lively.
This activity helps with finger control and pattern making, which makes it both fun and useful. Kids can build a bracelet, a hanging garland, or a pretend necklace for a doll or stuffed animal.
Mixing colors gives the chain a personal style, and children can choose a theme like rainbow, ocean, or sunset. Because the beads are tiny, this project uses clay wisely and can stay very affordable for big groups.
When dry, the beads can be painted with dots, zigzags, or shiny spots for extra flair. Many kids enjoy this modern handmade look because it feels a little like trendy jewelry from a craft market.
13. Clay Monster Magnets

Top Clay Monster Magnets Craft Tutorials
- 🍅 Very silly monster magnets. 👾 from facebook.com.
- 🍁 Monster Clay Magnets from tiktok.com.
- 👓 32 DIY Clay Monster Craft Ideas That Let You Go Full … from wonderfuldiy.com.
- 🎄 i'm bringing this sweet gaggle of new polymer clay … from instagram.com.
Clay monster magnets are silly little faces with big mouths, lopsided eyes, and wiggly teeth. They sit on the fridge and make everyday notes look more playful.
This craft gives kids a chance to be goofy and creative without worrying about perfect shapes. Add a small magnet after the clay dries, and use bright paint to make each monster pop.
Children can give their monster a name, a mood, and even a favorite snack. The project is easy to personalize, and it works well with leftover clay, so the cost stays nice and low.
Some families like making a whole monster set in matching colors for a fun display. The current love for funny faces and bold home decor makes these tiny characters feel right at home.
14. Clay Alphabet Stamps

Top Clay Alphabet Stamps Craft Tutorials
- 🍅 Clay Letter Stamp Sets from sculpd.com.
- 🖼️ Letter Stamps For Clay from walmart.com.
- 🍁 Clay Stamps Set of 14 | Clay textures and cutters – eBay from ebay.com.
- 🍂 Alphabet stamps for clay with visible letters from facebook.com.
- 👓 Where can I buy stamp letters for clay (small for dog tags) … from reddit.com.
Clay alphabet stamps turn learning letters into hands-on fun. Kids flatten small clay pieces and press in letters with safe stamps, bottle caps, or simple tools.
This activity supports reading readiness and gives children a clear way to connect sounds with shapes. Try making names, short words, or favorite initials, and let kids decorate the edges with lines or dots.
Because each tile can be small, the project uses only a little clay while still making a big learning impact. Children can choose colors, add sparkle, or make a set for their desk, which gives the craft a personal touch.
Teachers and parents often like letter crafts that feel modern and useful at the same time. If the clay is soft enough, kids can repeat the stamp and compare how deep or light each press looks.
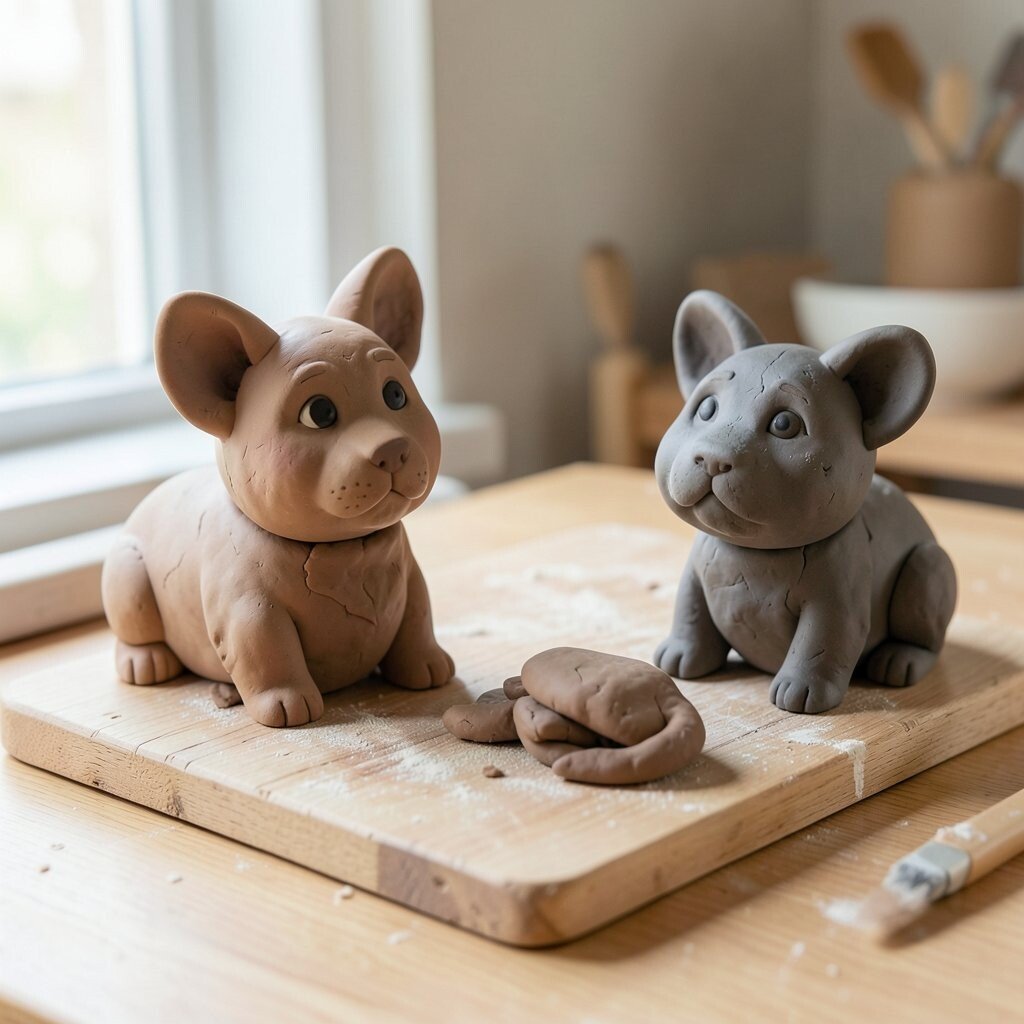
15. Clay Pet Portraits
Top Clay Pet Portraits Craft Tutorials
- 🖼️ Polymer clay pet portraits with acrylic paint from facebook.com.
- 🖼️ Handmade polymer clay pet portrait from facebook.com.
- 👓 NH Chronicle: Pet Portraits in Felt and Clay from wmur.com.
- 💅 Handcrafted clay family portraits with pets, custom … from ebay.com.
- 🧑🌾 Looking for an artist who can paint a dog print from a clay … from reddit.com.
Clay pet portraits are sweet little faces of a dog, cat, fish, rabbit, or favorite made-up pet. The round cheeks, floppy ears, and tiny noses can be simple yet full of character.
This project helps kids notice features and practice careful shaping without needing advanced skills. Ask children to think about their pet’s color, fur, or funny habits, then build the portrait with easy shapes.
These portraits feel extra special when kids add a collar, name tag, or favorite toy beside the face. They can be made with low-cost air-dry clay and painted later in colors that match the real pet or a playful fantasy version.
Many families enjoy pet art because it feels warm, personal, and meaningful. The finished piece can sit on a shelf, hang on a wall, or become a gift that makes someone smile every time they see it.