Clay can feel calm and exciting at the same time. With the right tools, simple lumps turn into tiny works of art.
Each tool leaves its own mark, which makes every project feel special. Some ideas are quick and cheap, while others invite you to spend a little more for finer detail.
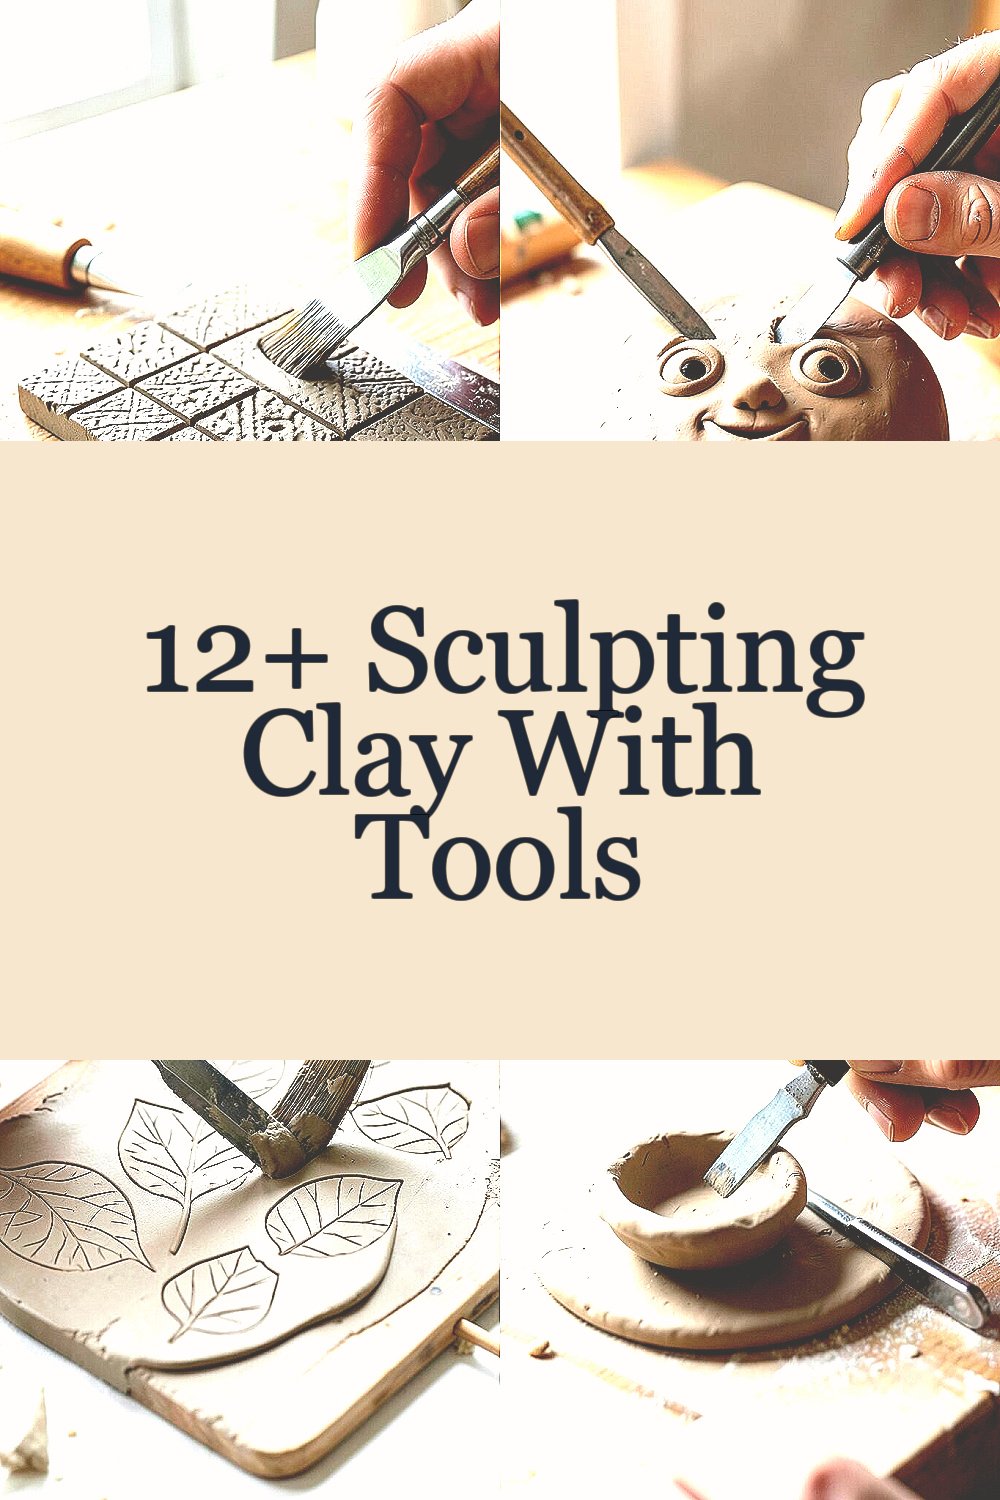
1. Make Tiny Texture Tiles With Everyday Tools

Top Make Tiny Texture Tiles With Everyday Tools Craft Tutorials
- 🎄 Creating texture with cardstock tiles from facebook.com.
- 🍅 Creative Tile Crafts for Kids: Sparking Imagination & Skill- … from imthecheftoo.com.
- 🎨 Ideas please, for the best way to make mini floor tiles. Fimo … from facebook.com.
- 💅 How To Make Your Paper Dollhouse Tiles Look More … from instagram.com.
- 🍁 Make Process Art Play Tiles – A Cool Kids Art Tool from barleyandbirch.com.
Flat clay tiles are a great way to test tools and see what they can do. A fork, comb, pencil, or bottle cap can make neat lines, dots, and grooves that look lively on the surface.
These tiles are fun because they are fast and low-cost, and they help you learn how clay reacts. You can press in leaves, lace, buttons, or fabric for a one-of-a-kind look, then paint the dry pieces in bright colors.
2. Shape Mini Faces With Loop Tools

Top Shape Mini Faces With Loop Tools Craft Tutorials
- 🎨 Tools for 28mm-32mm miniature sculpting with fine detail? from facebook.com.
- 🍂 Learn To Sculpt a Head & Face From Polymer Clay … from cdhm.org.
- 🎨 Sculpting With Polymer Clay : 8 Steps (with Pictures) from instructables.com.
- 🍁 Best way to model a bunch of small holes : r/blenderhelp from reddit.com.
- 🍁 craft of model making | davidneat from davidneat.wordpress.com.
Loop tools are handy for carving out eyes, mouths, and hair in soft clay. The hollow metal end makes clean cuts, so tiny face details can look crisp and charming.
This idea is nice for kids, beginners, and anyone who likes character art. Try making silly faces, sleepy faces, or fantasy faces, and give each one a different nose, eyebrow, or hairstyle.
If you want a personal touch, add freckles, glasses, or a favorite hat shape. Loop tools are not too pricey, and a small set can last a long time if you keep them clean and dry.
3. Build Leaf Prints and Garden Shapes

Top Build Leaf Prints And Garden Shapes Craft Tutorials
- 🍂 5 Minute Beautiful Leaf Prints Art (& 3 Secret Tips) from apieceofrainbow.com.
- 🗺️ Autumn Leaf Crafts and Activities for Kids from woodlandtrust.org.uk.
- 🗺️ 7 Easy Leaf Craft Ideas for Kids from thimbleandtwig.com.
- 🍅 Creative Ideas for Making Leaf Art: Craft Unique Gifts from thezoofamily.com.
- 🎨 3 Ways To Make Prints With Leaves from hobbyfarms.com.
Leaves make beautiful marks in clay because their veins look fine and delicate. Press a leaf into a slab, lift it off gently, and you get a natural pattern that feels fresh and earthy.
This idea works well for trays, ornaments, and wall hangings. You can use real leaves from your yard or buy craft leaves if you want a more lasting shape, and the cost can stay very low.
Mix large leaves with tiny ones for a layered look that feels modern and stylish. Many makers now like nature-inspired clay pieces, so this is a current trend that still feels easy and personal.
4. Carve Tiny Bowls With Ribbon Tools

Top Carve Tiny Bowls With Ribbon Tools Craft Tutorials
- 💅 Carved Bisque Bowl Molds from ceramicartsnetwork.org.
- 🖼️ Hand holding a bowl I carved these a few years ago from facebook.com.
- 🍅 I really enjoyed getting into the rhythm of carving these … from instagram.com.
- 🍁 This little carving and scupltin tools are my favorites lately. … from instagram.com.
- 👓 Carve a Bowl from a Board from finewoodworking.com.
Ribbon tools can scoop out clay smoothly and make shallow bowls or hollow shapes. The curved edge gives a soft, rounded finish that looks neat and polished.
These tools are useful when you want to make little trinket dishes, tea-light holders, or seed pots. They help save time because they remove clay fast, but they still let you control the shape.
For a custom touch, carve wavy rims, thumb dents, or tiny symbols on the sides. Ribbon tools can cost a bit more than basic craft tools, yet they are worth it if you plan to make many pieces.
5. Create Animal Tracks and Story Stones

Top Create Animal Tracks And Story Stones Craft Tutorials
- 💅 How to Create Story Stones from countryliving.com.
- 🎨 Wild Wonders at Home: Engaging Animal Craft for Kids from imthecheftoo.com.
- 🗺️ Children create animal habitats using open-ended materials from facebook.com.
- 🍅 45 Preschool Farm Theme Activities from howweelearn.com.
- 🧑🌾 Developing Early Childhood Writing Skills: 10 Fun Activities from klaschools.com.
Clay can become a tiny world full of paw prints, feathers, and shells. Pressing tools and found objects into the surface helps you build stories that feel playful and alive.
Story stones are easy to make and fun to hold, so they work well for games or room decor. You can shape each stone a little differently, then use paint or glaze to bring out the marks.
Try making a fox track, a bird wing, or a fish scale pattern for variety. This kind of project is budget-friendly because many of the best tools are things you already have at home.
6. Add Sharp Lines With Clay Cutters and Blades

Top Add Sharp Lines With Clay Cutters And Blades Craft Tutorials
- 🖼️ How to make clean cuts with micro cutters? from facebook.com.
- 🍂 What Makes a Quality Polymer Clay Cutter? Let's Break It Down! from ccb-blogs.craftyclaybabes.com.
- 🖼️ Say goodbye to tricky clay cutting! 🎯 With the Harp Cutter … from facebook.com.
- 🎄 The easiest way to create even stripes with your clay. If you' … from instagram.com.
Clean edges can make clay art look modern and bold. Straight cutters and small blades help you slice triangles, stars, hearts, and other crisp shapes with ease.
This style is great for earrings, charms, and geometric wall art. It also helps when you want pieces that fit together neatly, like puzzle tiles or layered ornaments.
To make the design your own, mix smooth cuts with tiny stamped marks or painted dots. Sharp tools are often low-cost, but always use them with care and a safe workspace.
7. Press in Buttons, Beads, and Stamps

Top Press In Buttons, Beads, And Stamps Craft Tutorials
- 🍅 Aeroplane Button/Beads Art just done from facebook.com.
- 🖼️ Pearl Setting Machine Kit DIY Hand‑Made Beads Rivet Button … from ebay.com.
- 🗺️ Button Trees – Great Christmas Craft from pattystamps.com.
- 🎄 Buttons, beads and burlap! Chicken creation by. … from facebook.com.
Stamped clay can look fancy with very little effort. Buttons, beads, and rubber stamps leave repeating patterns that feel tidy and cheerful.
This is a smart choice when you want fast results and a nice finish. It works well for gift tags, magnets, and pendants, and you can use old craft supplies to keep costs down.
Choose one pattern for a clean look or mix several for a busy, playful style. Many makers like stamped clay because it feels handmade, yet it still looks neat enough for gifts or small shop items.
8. Sculpt Mini Food With Detail Tools

Top Sculpt Mini Food With Detail Tools Craft Tutorials
- 💅 I Sculpt Miniature Food w/ Clay! from lemon8-app.com.
- 🗺️ How to Sculpt Bakery Foods Using Polymer Clay from skillshare.com.
- 🗺️ What are some ideas for miniature food sculpting? from facebook.com.
- 👓 Tools That You Will Need To Make Miniature Food from sculpey.com.
- 🗺️ Polymer Clay Sculpting: Miniature Food Level 1 from outschool.com.
Mini food pieces are cute, funny, and full of tiny details. A pointed tool can make bread crusts, fruit seeds, frosting swirls, and little crinkles that bring the piece to life.
This idea is perfect for dollhouses, pretend play, or charm bracelets. You can make cupcakes, sushi, donuts, or fruit slices, then paint them in bright colors for extra charm.
Add your own favorite snack to make the set feel personal and unique. Detail tools may cost more than simple sticks, but they help your tiny food look much more realistic.
9. Make Wall Art With Layered Clay Shapes

Top Make Wall Art With Layered Clay Shapes Craft Tutorials
- 🧑🌾 10 Creative Wall Art Ideas Using Polymer Clay from jennaclays.com.
- 🍅 Mud Mirror Art : 13 Steps (with Pictures) from instructables.com.
- 👓 28 *Playful* DIY Clay Ideas That Are So Much Fun to Make from wonderfuldiy.com.
- 🍂 20+ Aesthetic Clay Ideas: Easy DIY Projects for Cute … from lemon8-app.com.
- 🎨 Make such beautiful art with these easy steps😍 Plaster and … from facebook.com.
Layered clay art stands out because it has depth and shadow. You can stack petals, waves, clouds, or abstract shapes to build a piece that looks rich and full.
This is a lovely way to fill a blank wall with handmade style. Use cutters, rollers, and texture tools to keep each layer interesting, and pick colors that match your room.
For a personal twist, add initials, favorite colors, or shapes from a special memory. Layered art can be simple and cheap if you keep the design small, or more costly if you add many pieces and special finishes.
10. Try Jewelry Shapes With Fine Needle Tools

Top Try Jewelry Shapes With Fine Needle Tools Craft Tutorials
- 🍂 Start Jewelry Making Today – Tools, Techniques & DIY Ideas from hemptique.com.
- 🎨 Wire Crafts: Easy Embellishments! from thegraphicsfairy.com.
- 🎄 Students will explore unusual materials including found … from instagram.com.
- 🍁 Best Precision Tools for Jewelry Making: A Beginner's Guide from excelblades.com.
Needle tools are great for tiny holes, thin lines, and delicate patterns. They help you make earrings, pendants, and charms that look neat and light.
This project is popular right now because handmade jewelry feels fresh and special. You can create modern shapes, flower cutouts, or abstract lines, then choose jump rings and hooks that match your style.
If you want a custom look, stamp a name, a date, or a tiny symbol into the clay. Fine tools are usually affordable, and they can make even simple designs look polished and thoughtful.
11. Roll Out Nature-Inspired Coasters

Top Roll Out Nature-Inspired Coasters Craft Tutorials
- 💅 Sculpture of 11 Coasters from Cook's Valley Farm … from americanstonecraft.com.
- 🧑🌾 MAKE FREEFORM COASTERS in different shapes like … from facebook.com.
- 🗺️ DIY WATERMELON COASTERS version 2. I uploaded this … from instagram.com.
- 👓 36 DIY Clay Coaster Ideas That Will Make Your Guests … from wonderfuldiy.com.
Coasters are useful, pretty, and easy to personalize. Roll clay into flat circles or squares, then press in bark lines, shell shapes, or plant textures for a calm natural feel.
This idea is nice for gifts because people can use them every day. You can keep the colors soft and earthy or go bright and bold, depending on the room they will live in.
Try adding a name, a family initial, or a tiny icon to make each coaster special. Basic cutters and texture tools keep the price low, and the finished set can look much more expensive than it is.
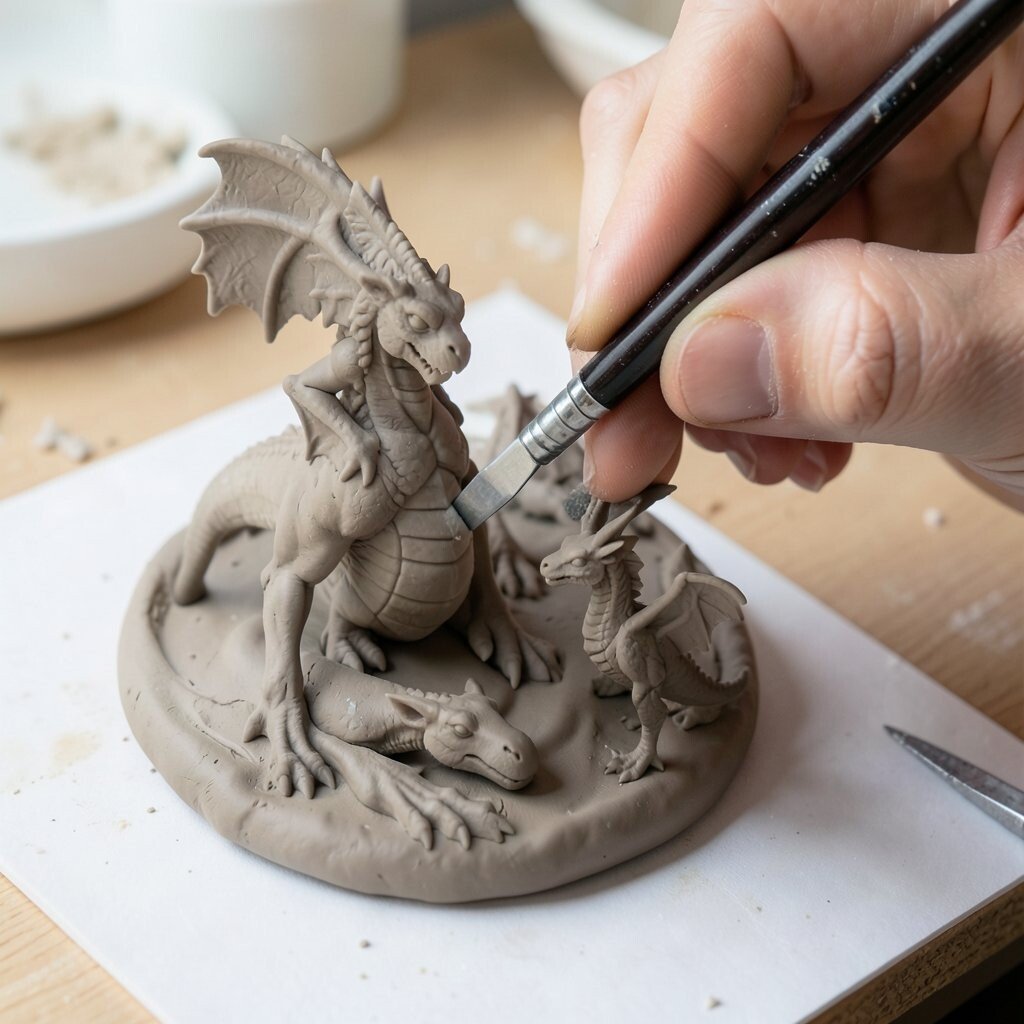
12. Carve Fantasy Creatures and Tiny Dragons
Top Carve Fantasy Creatures And Tiny Dragons Craft Tutorials
- 💅 Carving a Fantasy Dragon Relief: Your Legendary Guide from beavercrafttools.com.
- 💅 Carving wood into dragons is like coaxing ancient tales to … from facebook.com.
- 🎄 #carving #woodendolls #characterdesign #craft # … from instagram.com.
- 🎄 Carving fantasy dragon from wood pattern from facebook.com.
- 🎨 My Wood Dragon Carving Process: A Creative Journey from lemon8-app.com.
Fantasy clay pieces give you room to be wild and playful. With small carving tools, you can shape wings, scales, horns, and tails that make each creature feel magical.
This kind of art is great for people who like stories and game worlds. You can make one creature at a time or build a whole family with different colors, poses, and expressions.
Add your own style by choosing smooth, round shapes or sharp, edgy details. Fantasy clay art can be made on a tight budget, and it often becomes a favorite because no two creatures ever look the same.
13. Finish With Polished Surface Designs

Top Finish With Polished Surface Designs Craft Tutorials
- 🎄 13 Pottery Surface Decorating Techniques + A Glittery Bonus! from meeshpottery.com.
- 🍁 – This 13-second video captures a mesmerizing moment in … from instagram.com.
- 🎄 Miniature finishing techniques for a polished look from facebook.com.
- 🍂 Choosing the Perfect Mod Podge Finish: A Visual Guide from modpodgerocksblog.com.
A smooth surface can make clay pieces look calm and refined. Sanding, smoothing, and gentle polishing with soft tools can remove bumps and give your work a clean shine.
This final step is useful for almost any clay project, from beads to bowls. It also helps colors look brighter and patterns stand out more clearly, which makes the whole piece feel more complete.
Try a matte finish for a soft modern look or a glossy finish for something bold and bright. Surface finishing is a smart place to save money too, because a simple tool set can make even plain clay look carefully made.